The virtual appliance and standalone deployment of Symantec (CA) Identity Suite allow for redirecting authentication for the J2EE tier application through Symantec SSO or directly to an Active Directory domain, instead of the existing userstore for the solution.
Challenge:
The standalone deployment of Symantec (CA) Identity Suite on MS Windows OS allowed for the mid-tier component to utilize PAM modules to redirect to AD authentication for the Global User.
However this PAM feature does not exist for Provisioning Servers on the virtual appliance.
To be clear, there are no expectations this feature will be introduced in the future roadmap for the solution, as the primary UI will be the web browser.

Review:
Symantec (CA) Identity Suite architecture for virtual appliance versus standalone deployment architecture.
- The standalone deployment architecture has both MS Windows and Linux components of all tiers.
- The vApp deployment architecture has primary Linux components and few MS Windows components.
- The vApp MS Windows components do not include the IMPS (Provisioning Server)
Proposal:
To address this requirement of enabling AD authentication to the vApp Provisioning Server, we will introduce the concept of a “jump server”.
The “jump server” will utilize the standalone deployment of Symantec Identity Provisioning Server on an MS Windows OS. This “jump server” will be deployed as an “alternative server” integrated into the existing vApp Provisioning Directory deployment.

We will select deployment configuration ONLY of the Provisioning Server itself. We do not require the embedded CCS Service.

We will integrate this “jump server” deployment with the existing Symantec Identity solution.

Ensure the imps_datakey encryption seed file is in sync between all components vApp and standalone.

To avoid impacting the existing vApp deployment, we will NOT integrate the “jump server” deployment to the IME. The IME’s Directory XML for the Provisioning Directory will not be updated.
Important Note: The Symantec/CA Directory solution is required as a pre-step.
Summary of deployment steps:
- Select a MS Window OS workstation (clean or with JCS/CCS Services) that may be part of the MS AD Domain
- Option 1: [RECOMMENDED & PREFERRED] If using a clean OS, install MS .NetFramework 3.5.1 for the provisioning component.
- Open cmd as administrator to deploy: DISM /Online /Enable-Feature /All /FeatureName:NetFx3
- Option 2: [MED-HIGH RISK] If using “side-deployment” on an existing JCS/CCS server (MS Win OS), we will need to make modifications to this server.
- Will need to rename the file C:\Windows\vpd.properties to avoid conflict with the JCS/CCS component naming convention in this “registry” file. (see below screen shot)
- Will require a post-install execution of the IMPS pwdmgr tool to address an MS Registry path conflict between the CCS and IMPS components.
- Option 1: [RECOMMENDED & PREFERRED] If using a clean OS, install MS .NetFramework 3.5.1 for the provisioning component.

- Ensure all CA Directory hostnames are in DNS or in the MS Windows local host file (C:\Windows\System32\drivers\etc\hosts ) otherwise this “jump server” deployment will fail when it tries to validate all possible directory nodes’ hostnames and build the respective Directory knowledge files.

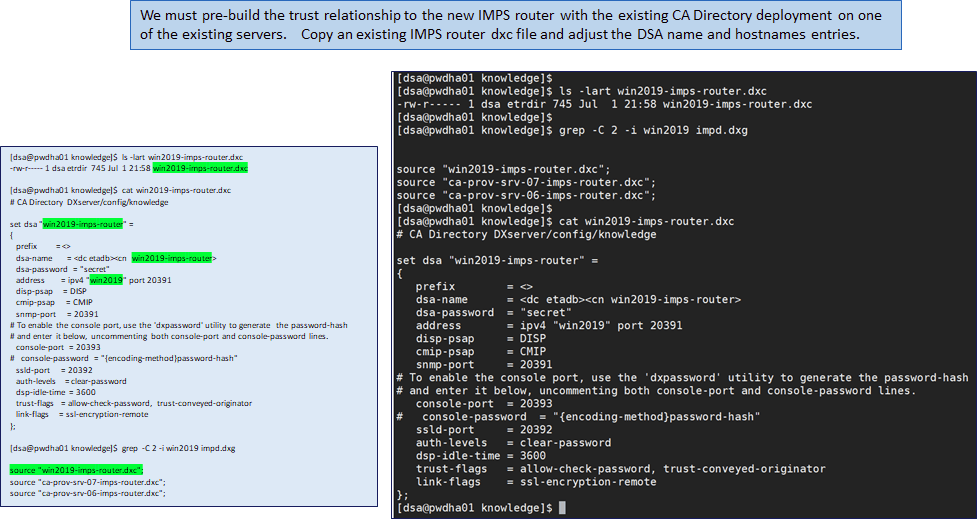
- Create a reference file for the new IMPS router dxc file on at least one of the existing vApp Identity Suite Directory Server otherwise this “jump server” deployment will fail due to trust issue when testing connections to other directory nodes’ hostnames.

- Deploy Symantec/CA Directory (if not already done) – default configurations. Otherwise, you will see this error message

- Deploy IMPS MS Windows – Only IMPS (no CCS) with Alternative Server Selection Configuration & update to latest CP patches. Note: For “side-deployment” only: If the vpd.properties file was not renamed, then a name collision will occur due to this registry file, if using the JCS/CCS server to side-deploy. It is low risk to change this file, as it is used to prevent deployments of lower release version of components over the prior installed higher release versions of the same component. If there is a concern, all components can be reinstalled as needed. Do not forget to install the latest CP patches to ensure this “jump server” is the same binary level as the vApp solution.

- Review of additional notes during deployment of “jump server”. Note: For “side-deployment” only: On the page that ask for the Identity Suite Directory connection information, you will see the solution attempt to load env variables that do not exist. Override these value and enter the Directory hostname, Port 20394, and the default bind DN credentials for a Directory userID: eTDSAContainerName=DSAs,eTNamespaceName=CommonObjects,dc=im,dc=etadb


- Deploy IMPM Manager GUI if needed.
- Post-Deployment – Update IMPM Manager GUI preference to ONLY connect to the new IMPS server on MS Windows. Use the “Enable Failover” checkbox and place the IP/hostname first in the list. Hint: Remove the other IMPS servers from this list or you may add an extra digit to the IMPS servers entries you wish to save, but prevent auto-connectivity to them. Confirm able to authenticate directly through the solution using prior credentials for your service ID: etaadmin or imadmin. This will validate connectivity to the existing vApp Identity Suite solution.

- On the “jump server” under the Provisioning Server\pam\ADS folder copy the etapam.dll to the IMPS \bin folder. Then copy the etapam_id.conf configuration file to the \pam parent folder. Update the parameters in this file. Set the enable= parameter to yes. Set the domain= to either the MS AD Domain or use the FQDN hostname of the ADS Domain Controller (DC). If we use the FQDN hostname of the DC the “jump server” does NOT have to be made a member of the MS AD Domain. Save the file and restart the “CA Identity Manager – Provisioning Server”


- Validate PAM functionality in the IMPS etatrans log is enabled. We will see two (2) entries: PAM: Initialization started (same for all use-cases) and PAM: Not enabled or No PAM managed endpoint. We want “PAM: No PAM managed endpoint” – That is an extra feature we could enable, but do not require for the “jump server” scenario.

- Validate PAM functionality with MS Sysinternals. Ensure that we copied the etapam.dll to the bin folder and that the configuration file is being read.

- Test authentication using IMPM Manager login as IMPS Manager Global User that has same userID format as AD sAMAccountName. Negative Use-Case testing: Create a new AD domain user that does NOT exist as a Global User and attempt to authentication. Test with etaadmin or other Global User that does NOT have a match AD sAMAcccount name entry. Review the IMPS etatrans logs on the “jump server”


Update the IMPS encrypted seed file imps_datakey as needed.
Note: The MS Win version of IMPS encrypted seed file may be different than the vApp seed.
If this step is skipped, there will be no obvious error message with the exception that a bind has failed for communication to the JCS/CCS services.
After this file is updated, we will need to re-install IMPS service to ensure that all prior encryption passwords are replaced with new passwords using the new seed file. Basically, we need to install the MS Win version of IMPS Server twice, e.g. standard install, change the seed file value, re-install with update all components and updated passwords.

CCS Service conflict with “side-loading” IMPS Service {“side-loading” methodology}
The “side loading “process of deploying the “jump server” IMPS Provisioning Server on the JCS/CCS Server will impact starting of the CCS service. The installation will update the MS Registry with extra branches and updated shared attribute values between the CCS service and IMPS service, e.g. ETAHOME.
This challenge is a strong reason why we may choose the “clean” installation methodology, to avoid this conflict and possible support challenge.

To address this concern, update the new registry values that store the embedded reversible encrypted password for the CCS Service. Use the password reset tool “pwdmgr” and reset the “Connector Server” for both “eta” & “im” domain to the prior stored password. If the imps_datakey file is not in sync between all provisioning servers (& ccs service), then we will see failed bind connections error messages in the logs.

We will now be able to stop/start the JCS service, and see the embedded CCS service stop and start as well.

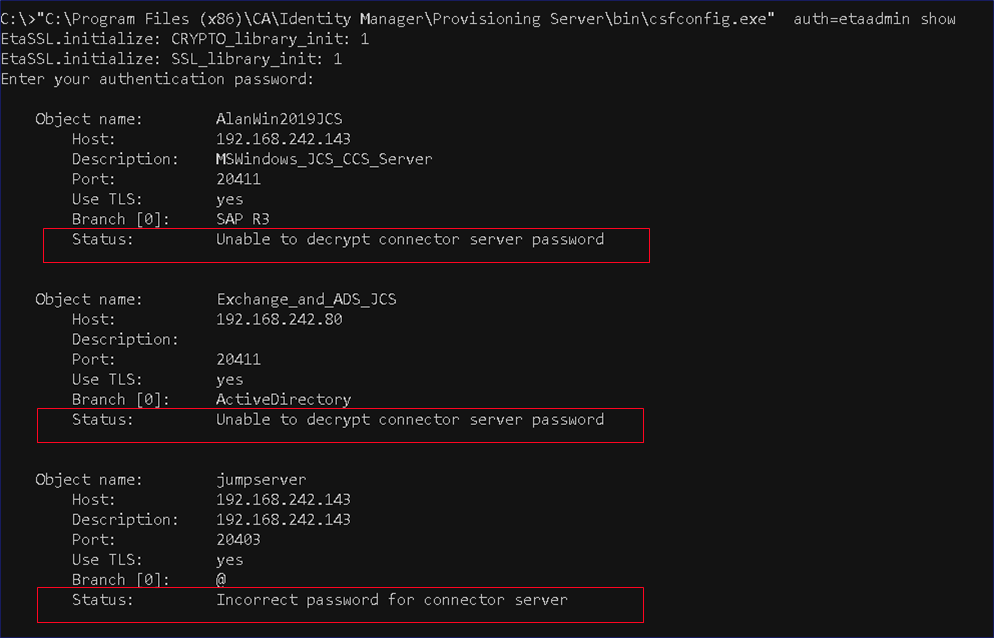
Example of challenge and error messages if imps_datakey is not updated and in sync.

Use the following command, csfconfig.exe, under the newly deployed IMPS bin folder to view the JCS connectors defined to the solution stack.
C:\Program Files (x86)\CA\Identity Manager\Provisioning Server\bin>csfconfig.exe auth=etaadmin show
EtaSSL.initialize: CRYPTO_library_init: 1
EtaSSL.initialize: SSL_library_init: 1
Enter your authentication password:


C:\Program Files (x86)\CA\Identity Manager\Provisioning Server\bin>echo Password01 > c:\imps.pwd


C:\Program Files (x86)\CA\Identity Manager\Provisioning Server\bin>csfconfig.exe auth=etaadmin add name=pamjcs host=192.168.242.143 pass=c:\imps.pwd br-add=@ debug=yes port=20411
EtaSSL.initialize: CRYPTO_library_init: 1
EtaSSL.initialize: SSL_library_init: 1
Enter your authentication password:
Created CS object with name = pamjcs

C:\Program Files (x86)\CA\Identity Manager\Provisioning Server\bin>csfconfig.exe auth=etaadmin remove name=pamjcs
EtaSSL.initialize: CRYPTO_library_init: 1
EtaSSL.initialize: SSL_library_init: 1
Enter your authentication password:


We will see both error status when the imps_datakey file is out-of-sync with others. Please ensure the Linux & MS Win versions are in sync.

You may view the file imps_datakey being referenced with the pwdmgr tool:
su - imps
strace -e trace=open,openat  pwdmrg
open(“/opt/CA/IdentityManager/ProvisioningServer/data/tls/keymgmt/imps_datakey”, O_RDONLY) = 5
You wish to monitor what accounts (embedded) are updated with the IMPS pwdmgr tool: su – imps and execute the two commands in a different SSH shell to monitor the pwdmgr.log that was enabled.
eta-env action=set name=eta_pwdmgr_log type=string value=true
tail -f $ETAHOME/bin/pwdmgr.log
Enablement of extra functionality (bypass the no-sync option on Global User password update)
You may wish to keep the Global User and AD password in sync. If they are not, then you will have two passwords that will work for the Global User account. The newer PAM AD authentication credentials, and the older Global User password. The etapam.dll module data path appears to check for PAM AD first, and if it fails, then it will check the Global User eTPassword field as well.
Enable the AD endpoint in the etapam_id.conf file. The type and domain will be as shown, e.g. Active Directory and im (for the vApp). The endpoint-name will be free-form and whatever you may have named your AD endpoint in the IMPS GUI.

Monitor the startup of the PAM module within the IMPS etatrans*.log

Perform a use-case test with changing a Global User account without correlation to an AD endpoint; and then retest with a Global User that is correlated to an AD endpoint. Do both test with NO SYNC operation

If the Global User is already correlated to an AD endpoint account, then we will see a “Child Modify” operation to the correlated AD endpoint account’s Password within the IMPS etatrans*.log.

One “gotcha”. There appears to be a check against the AD password policy. If the new password does not fit the AD password policy, the following error message will appear, “ETA_E_0007 <MGU>, Global user XXXXXXX modification failed: PAM account password updated failed: Account password must match global user password.


Another god idea, Will make ID Suite more robust/flexible for sites that use IMPS. Thanks.
Thanks Dan. I am re-checking for any “gotchas” with the “side-deployment” of IMPS with JCS/CCS MS Registry shared values that conflict. The clean deployment on a new MS Win Server seems to have no issues.