Simplify Passkey Registration with your mobile phone

You’re probably familiar with those emails that claim to be from your bank, CPA, or services like Microsoft and Google. They use deceptive tactics, such as subtly altered URLs and stolen branding, to trick you into entering your credentials on fraudulent sites. If you’re tired or distracted, it’s easy to fall for these schemes, which can put you at serious risk.

The great advantage and the “beauty” of passkeys is their ability to render these phishing attempts ineffective. By design, passkeys prevent remote phishing through email or text from achieving their goals, ensuring your credentials stay secure.

Why this works?

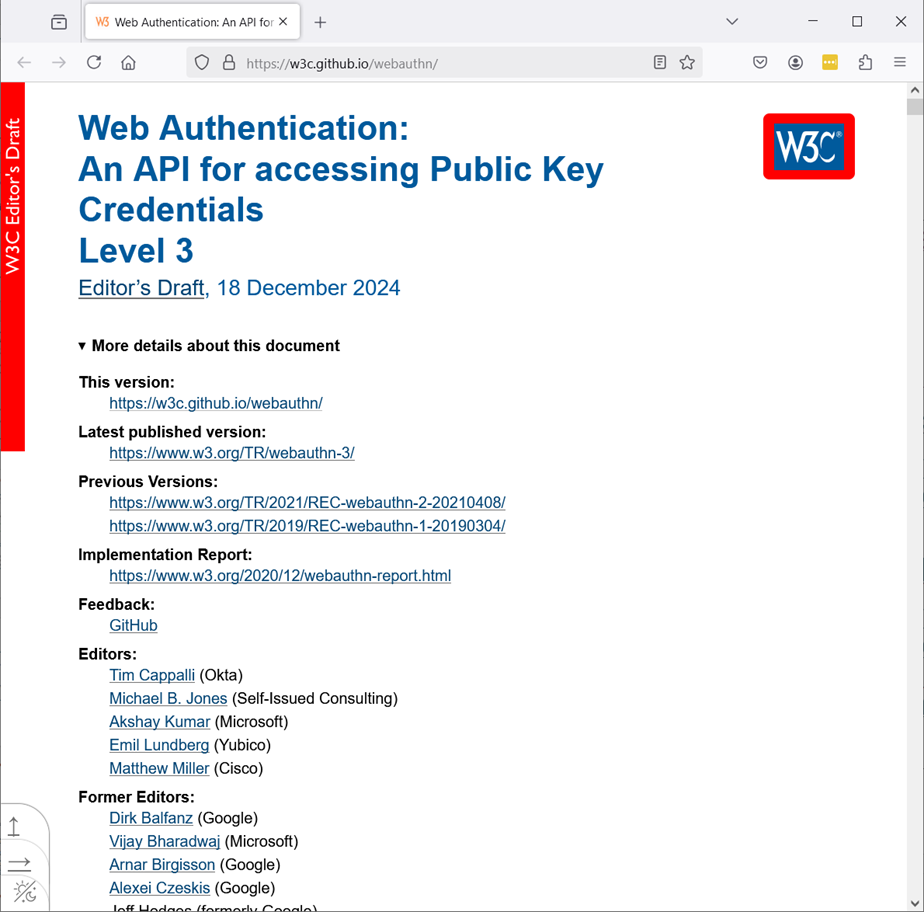
The “magic” or brilliance behind this innovation lies in the collaborative efforts of the industry at large, spearheaded by the FIDO Alliance, to establish a unified “standard.” This unified standard leverages public/private key functionality in a way that is user-friendly, making it easier for individuals to secure their remote accounts.

This new standard is already compatible with browsers on laptops and mobile devices. However, because it’s still relatively new, adoption among banks and financial institutions has been limited. For instance, I currently have only one financial institution using this standard. Most organizations still rely on two-factor authentication methods, combining a password with either an SMS code or an authentication app. That said, major global companies like Google and Microsoft are leading the charge in rolling out passkeys, and it’s only a matter of time before broader adoption follows.

How this works?

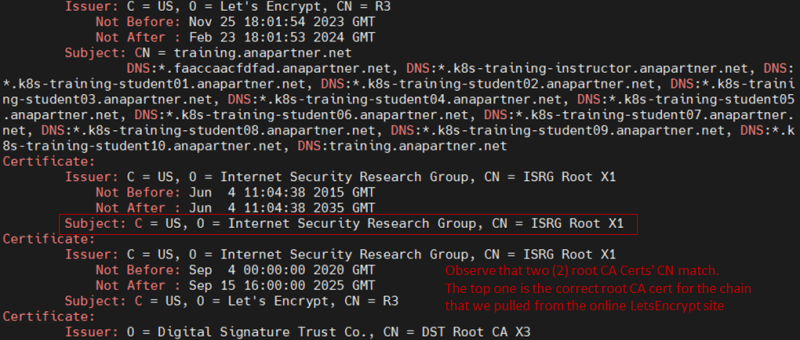
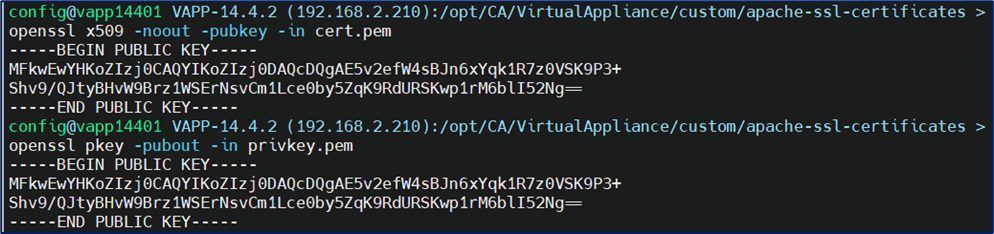
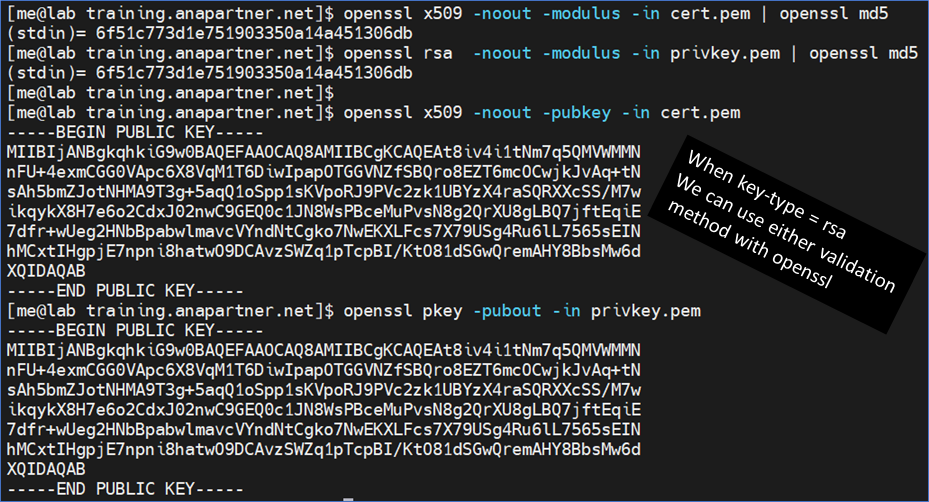
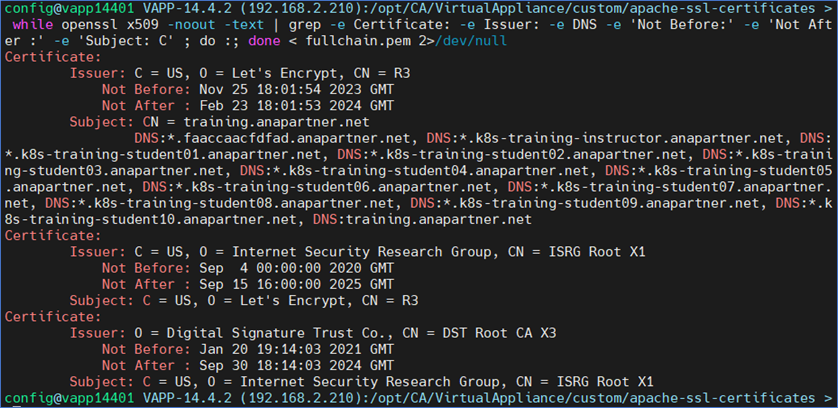
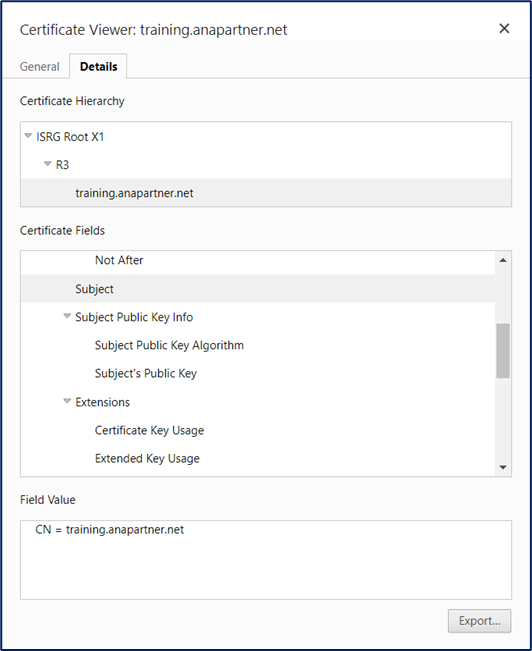
Background: The public-private key process (asymmetric cryptography) has evolved significantly, especially between 1990 and 2010, to enable secure online access, such as shopping and banking. Here’s how it works: A shopping or banking website hosts its public certificate (visible to anyone). When you access the site, it uses its private key (accessible only to the site) to validate this certificate. If the public and private keys match, the connection is secure, and you can confidently proceed with your transactions.

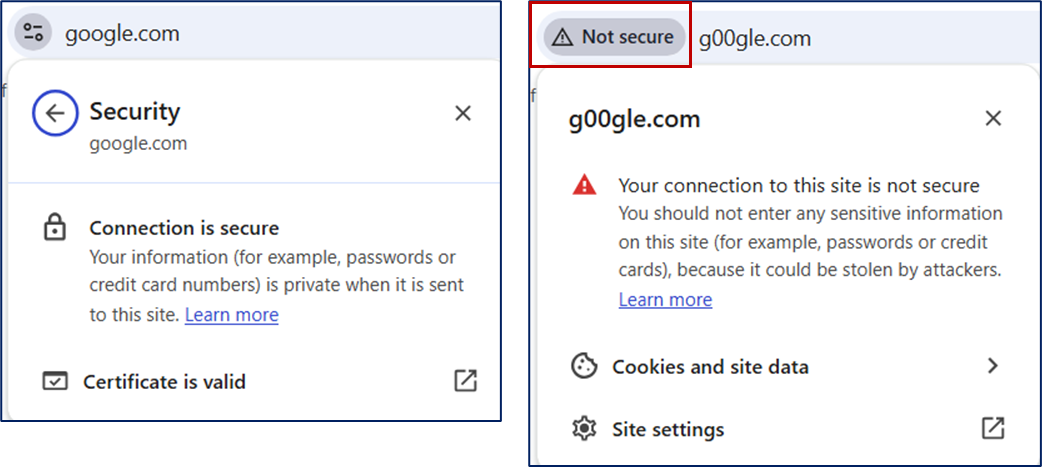
New Phishing Risks: Cyber-criminals (aka “bad-guys”) have become adept at creating convincing fake websites with their own public/private keys, paired with stolen images and content to appear legitimate. For years, we’ve been trained to trust the lock symbol in the URL bar as an indicator of a secure connection. However, this is no longer foolproof. For instance, a malicious site could use subtle tricks, like replacing the letter “o” with a zero in “google.com,” to deceive users. These tactics highlight the need to go beyond basic visual indicators and “raise the bar” on security to ensure our online activities remain safe.

Raise the Bar: With passkeys, the private key stays securely on your device (e.g., phone, workstation, physical security key, or tablet), while the public certificate is stored exclusively on the site where you registered. Authentication can only occur when the public certificate and the private key’s signature match, rendering interception attempts useless. This significantly raises the security “bar” against malicious remote access attempts.

That said, passkeys are still relatively new to global adoption, and their rollout is ongoing. While there are challenges, such as addressing backup and replication, these should not deter you from leveraging this technology to enhance your personal security.

Register a ‘passkey’ with your mobile phone.

Why? We want the bigger screens of private/public laptop/workstations and the security of the ‘passkey’ functionality with mobility.

If you are accessing a website from your phone, you will have no issue registering the passkey, because all components on your phone are trusted with each other, e.g. hardware chip to store the passkey (private key), the middle-ware software (SamSung Pass/Google Passkey/Apple Passkey), and your mobile browser.

The current challenge is using your mobile phone with your private laptop/workstation. This seems to be a “glossed” over area in current online docs. There is the assumption that all users have tied their “mobile phones” with their current private workstation. Unfortunately, this is a “gotcha” with using ‘passkeys”

Per the standard, Bluetooth is used as the primary communication between your mobile phone and the public/private laptop/workstation.

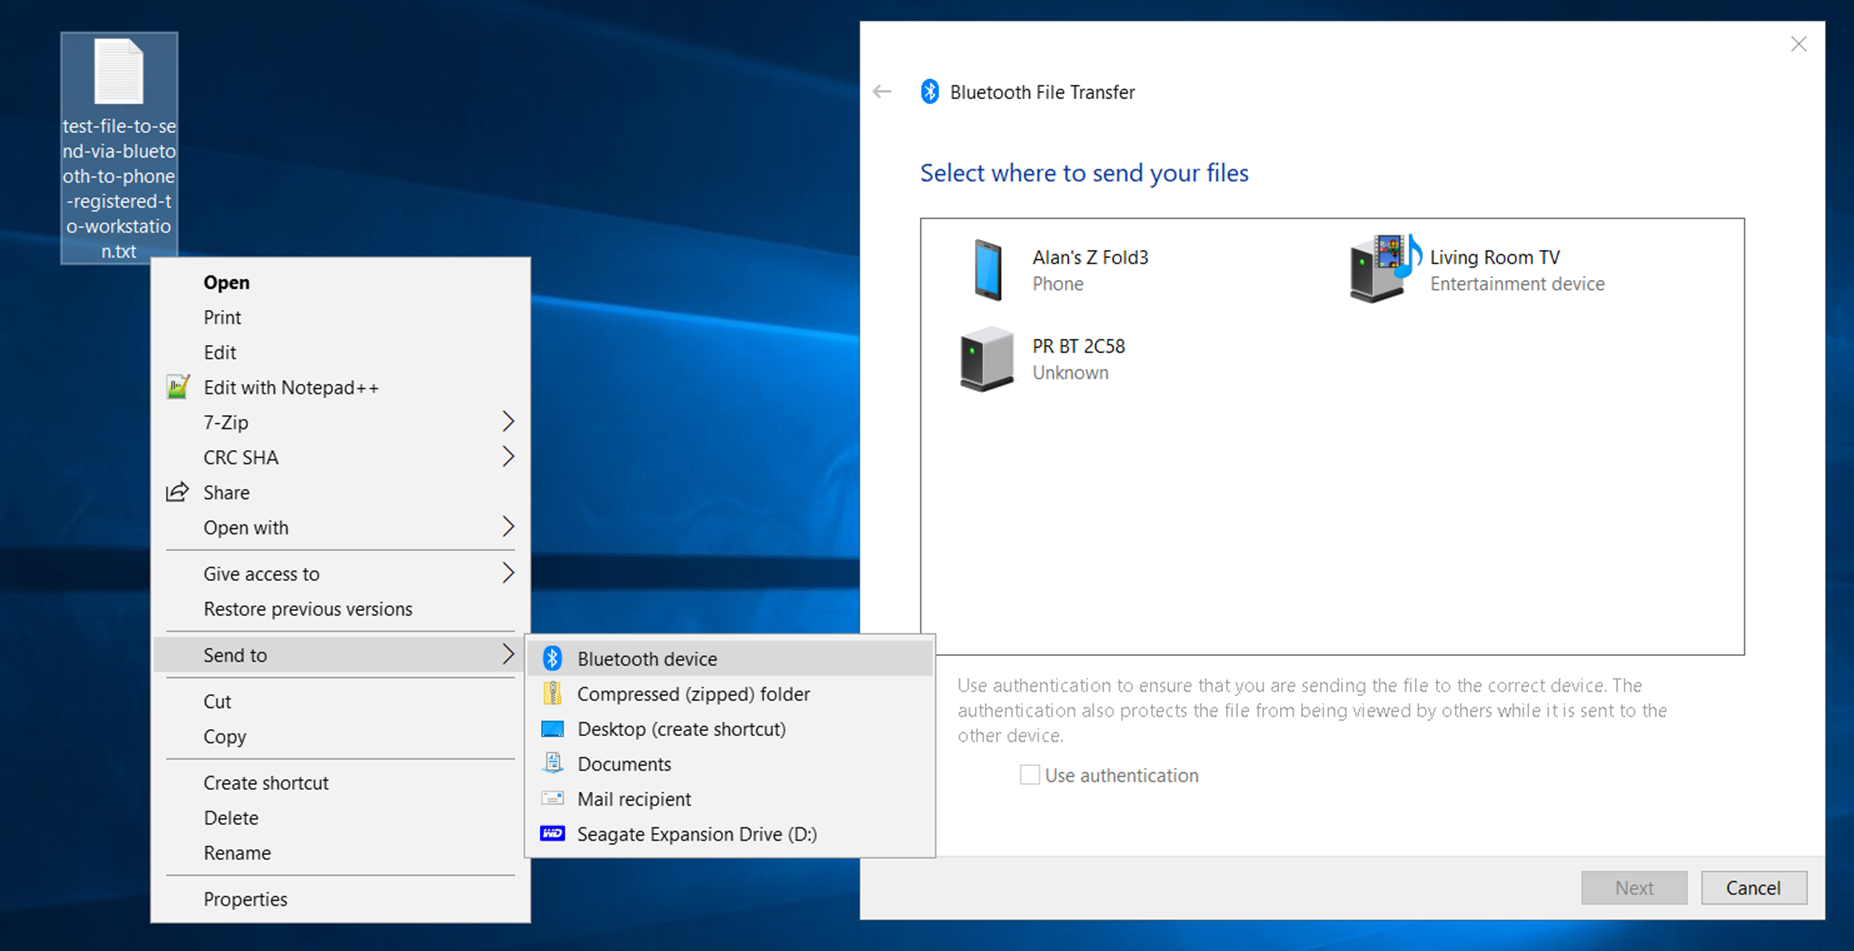
You can check if you have Bluetooth setup on your private laptop/workstation by using the built-in file copy operation. Below is a view of using this feature.

The mobile phone does have to advertise itself via Bluetooth first. The mobile phone does NOT have to be trusted first with the workstation. The operation can be approved when it occurs. This is similar how ‘passkey’ will work with your workstation (public or private).

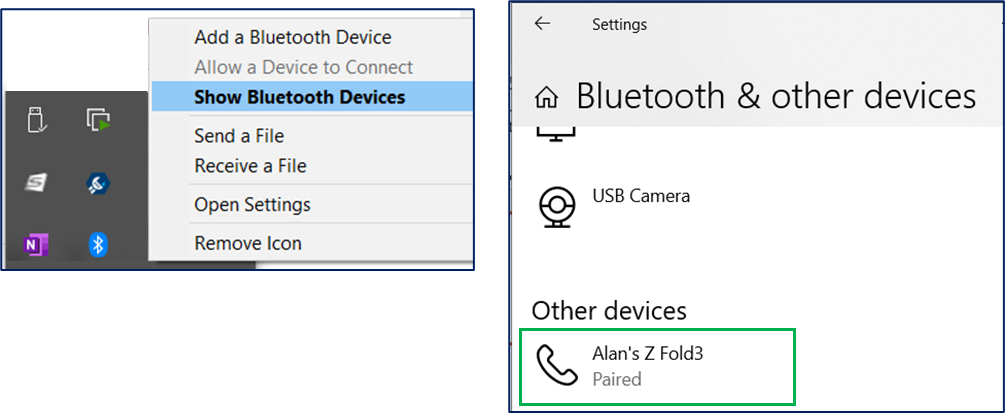
For registration with ‘passkey’ , I have found through trial-and-error, that what worked best, was to previously trust (aka “paired“) the mobile phone as a Bluetooth device first. Add & pair your mobile phone, as you would your keyboard or mouse that has Bluetooth functionality.

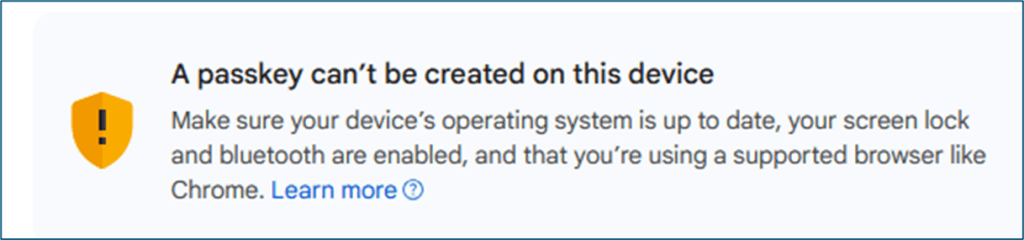
Ignore these false messages – Choose another device

Now, when you hit a site via a browser on your workstation, you can now continue even if you see a negative message that states “A passkey can’t be created on these device”. These message are only focused on your workstation (if it alone can support the ‘passkey’). We don’t care about these workstations at this time. Especially, if you are eventually going to be traveling and want the passkey on your mobile phone.

Look for the button or message that states “Use another device” or similar message.

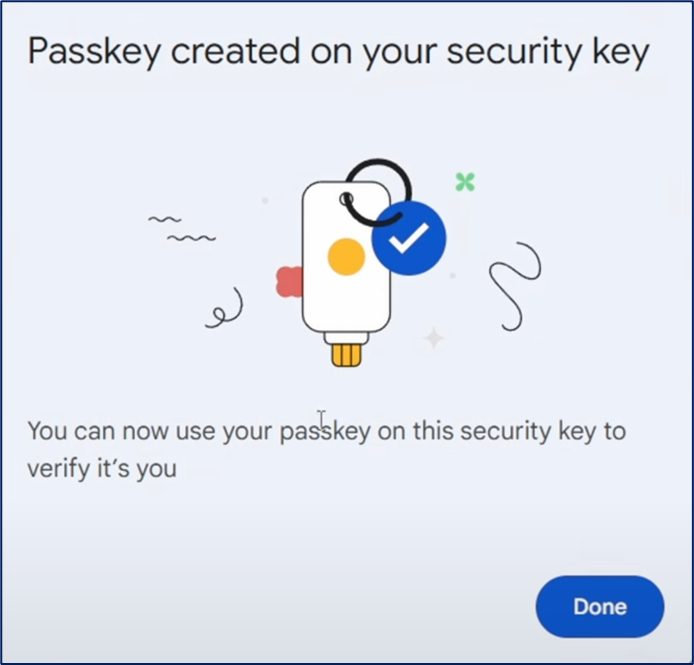
Example of ‘passkey’ registration. After you select your mobile phone, most websites will then offer a QR code to generate a new unique private-public key combo (aka the ‘passkey’) only for your account on their site. Use your phone, that has previously been Bluetooth paired to your private laptop/workstation, to register the ‘passkey’.

After you have registered the ‘passkey’ you can now leverage it from both your mobile web site, as well as from any workstation/laptop, including public workstations. You should see a popup box on your mobile phone via Bluetooth to authenticate with your ‘passkey’

Now, even if you still get a phishing email, and you inadvertently click on it. When the false-site asks for a password and you know you have a ‘passkey’, you can stop the process in its track.

Please be aware, that your original password is still on the proper valid site. It has NOT been removed due to you adding a ‘passkey’ for authentication. If you lose your mobile phone, you most likely will need to re-register with a new ‘passkey’ with a new mobile phone. The FIDO alliance is working with vendors to allow possible recovery, but some may argue that while useful, it defeat the purpose of ‘passkey’ that ONLY you have access to. You can catch up on what the latest recommendations are.

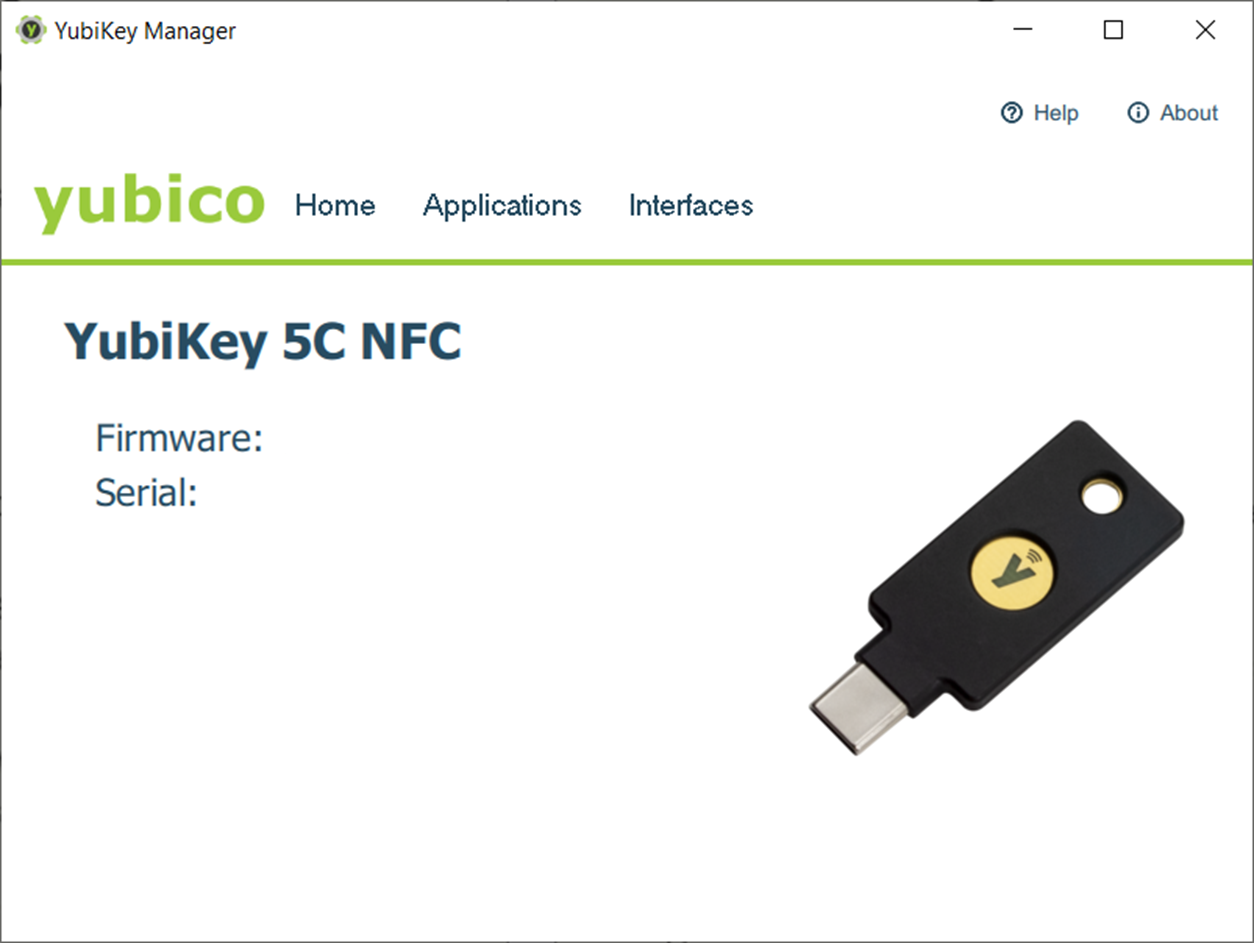
As my backup to my mobile phone, I am a fan of the YubiKey 5C NFC. This model has room for 100 ‘passkey’s and with the USB-C and NFC features, I can use it with any mobile phone or laptop. Adding a long PIN as well, so it fits the “something you know” + “something you have”. Similar to a mobile phone as the holder of the ‘passkey’.

Yubikey’s long info-graph document about the differences between ‘passkey’ types was useful.

Help your family, friends, and neighbors get on this ‘passkey’ band wagon.

Hopefully, knowing how to manage the Bluetoothgotcha‘ for registration, will allow you to use your mobile phone more effective with your laptop. You can still use Authentication Apps + ‘password’ as your intermediate authentication until your financial institutions and others switch over to offer ‘passkey’ as an option.

To learn more you may wish to review the longer blog entry.

Benefits of Passkeys: Stop Man-in-the-Middle / Phishing Attacks – ANA Technology Partner

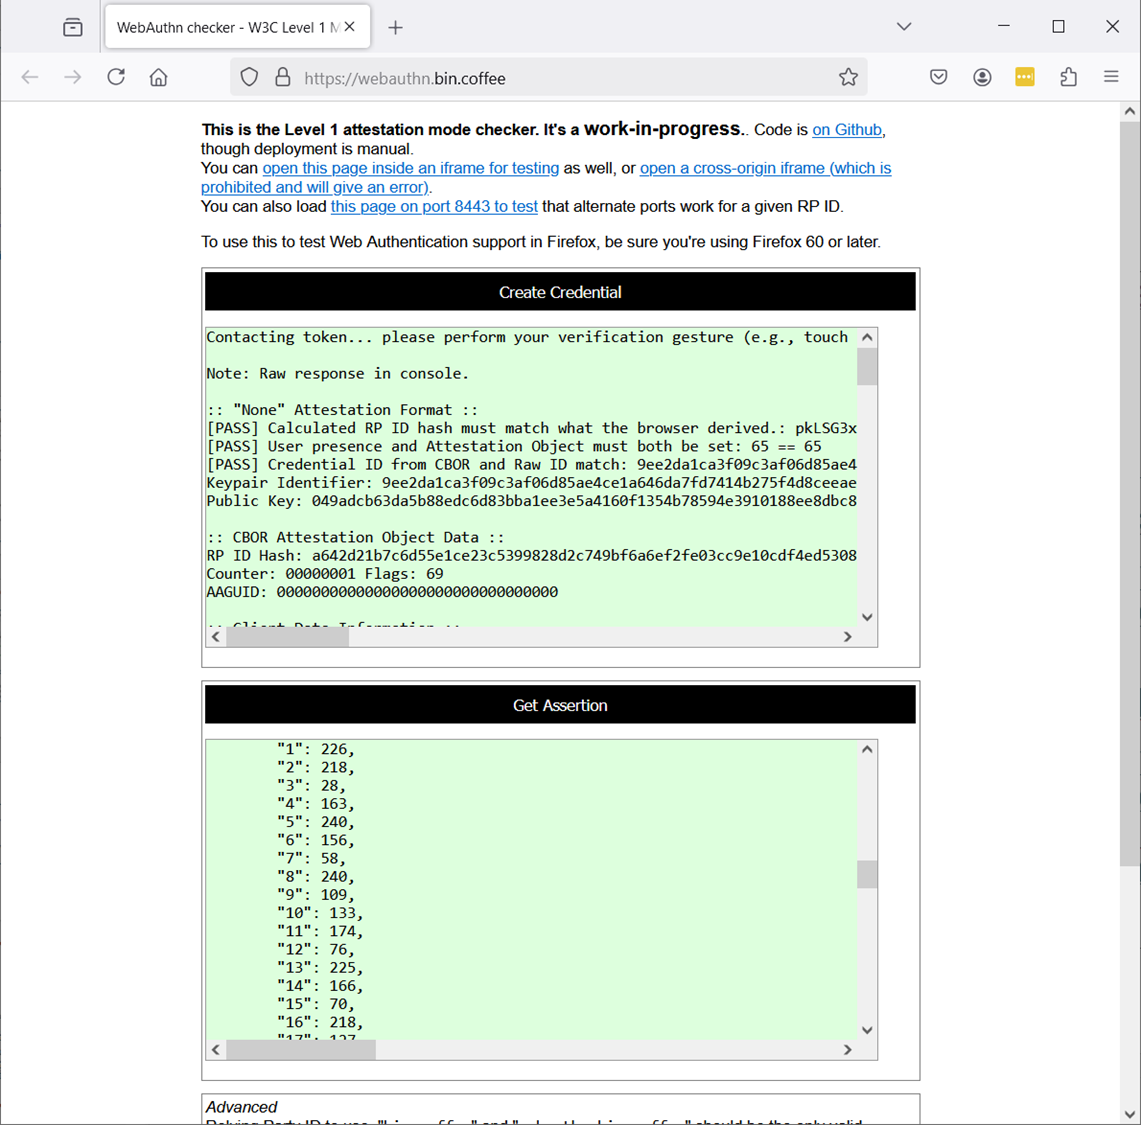
Optional: Testing with an external site

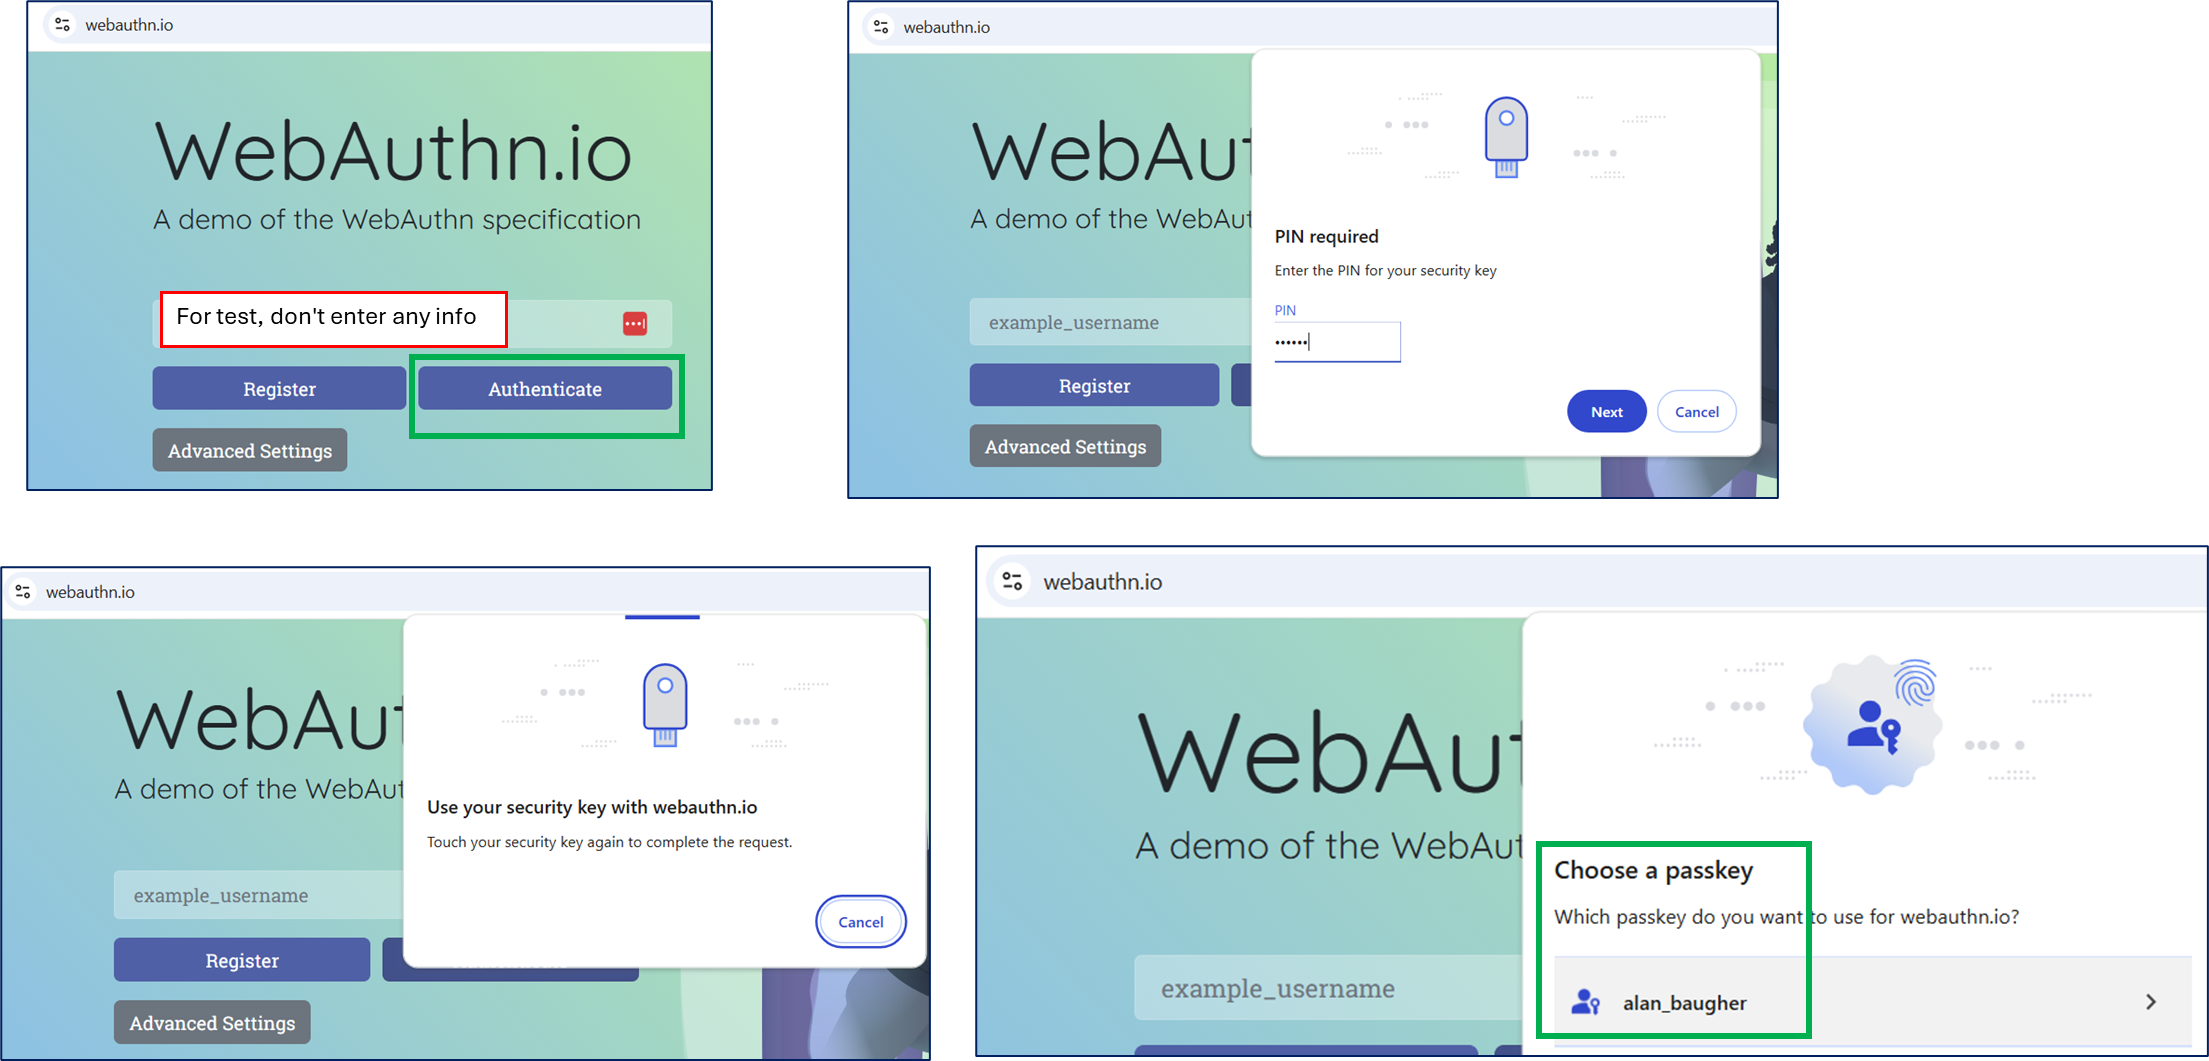
A useful site to test ‘passkey’, webauthn.io.

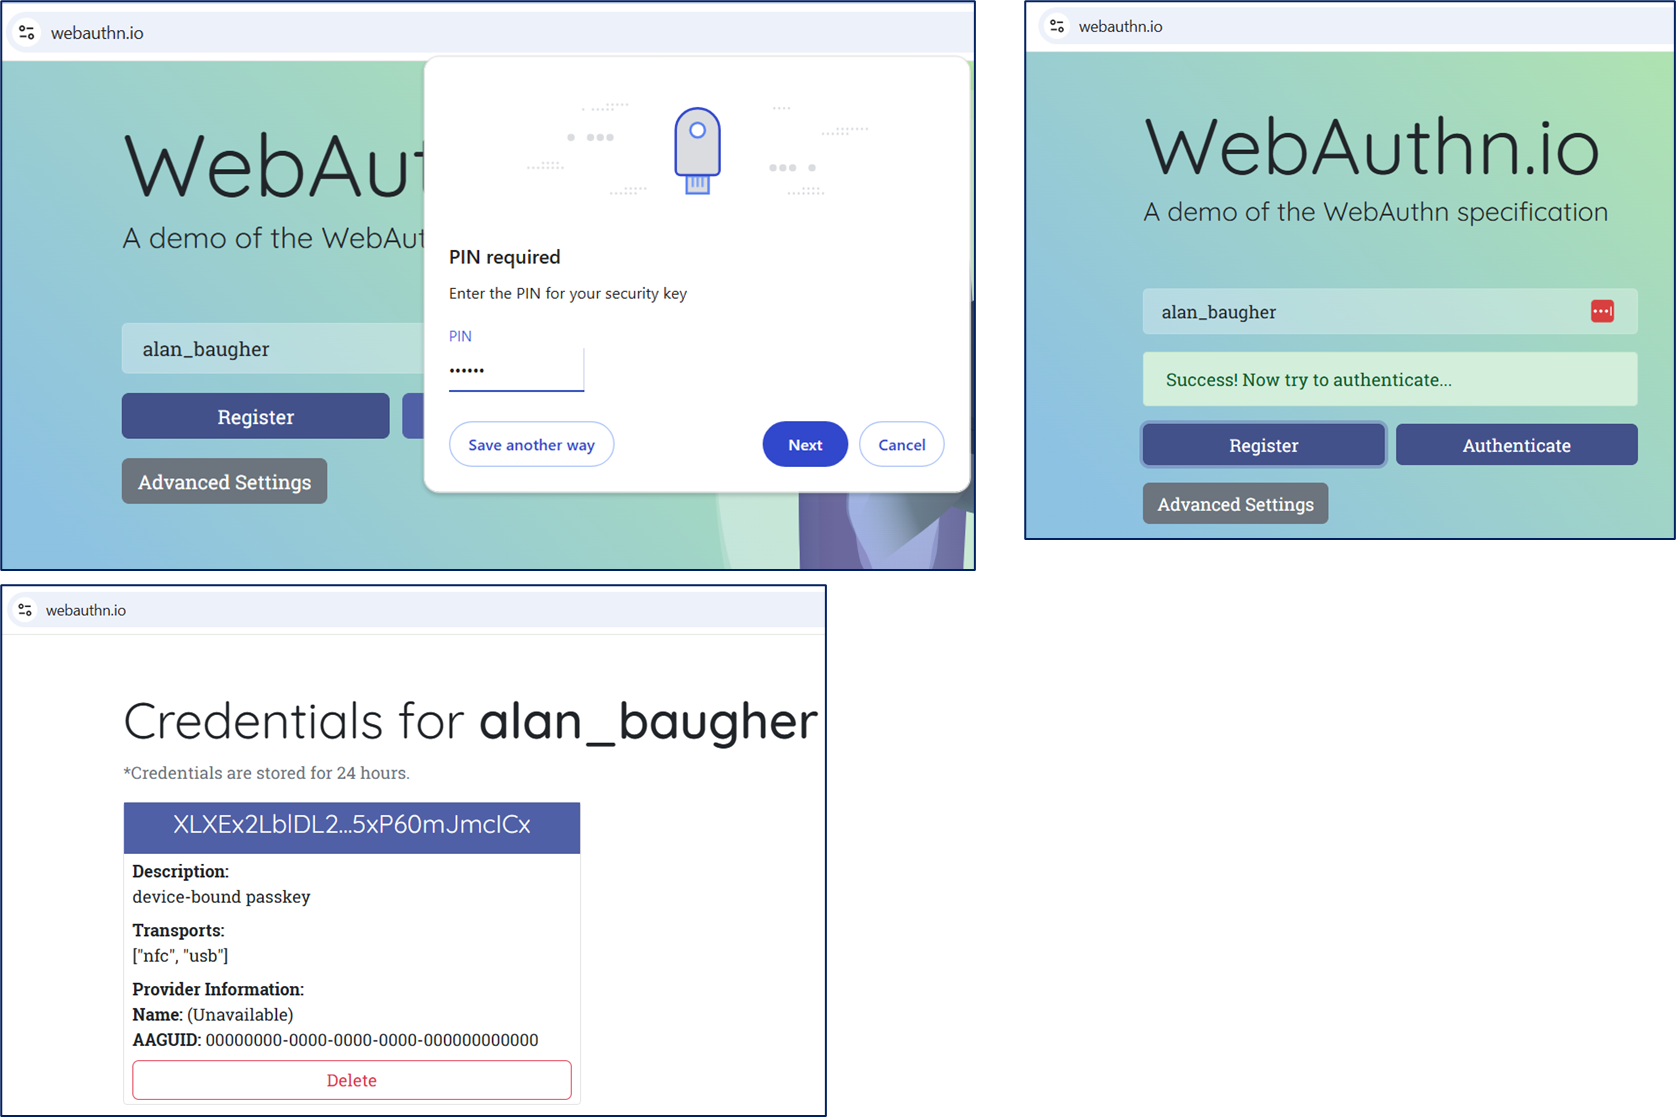
After creating your ‘passkey’, use the website again, but do not enter your username. Test with Authenticate button to let the browser work with your workstation, to pick a passkey associated with the website.

A view of the ‘passkey’ on a Yubikey via command line tool (ykman):

Fallback Registration – USB

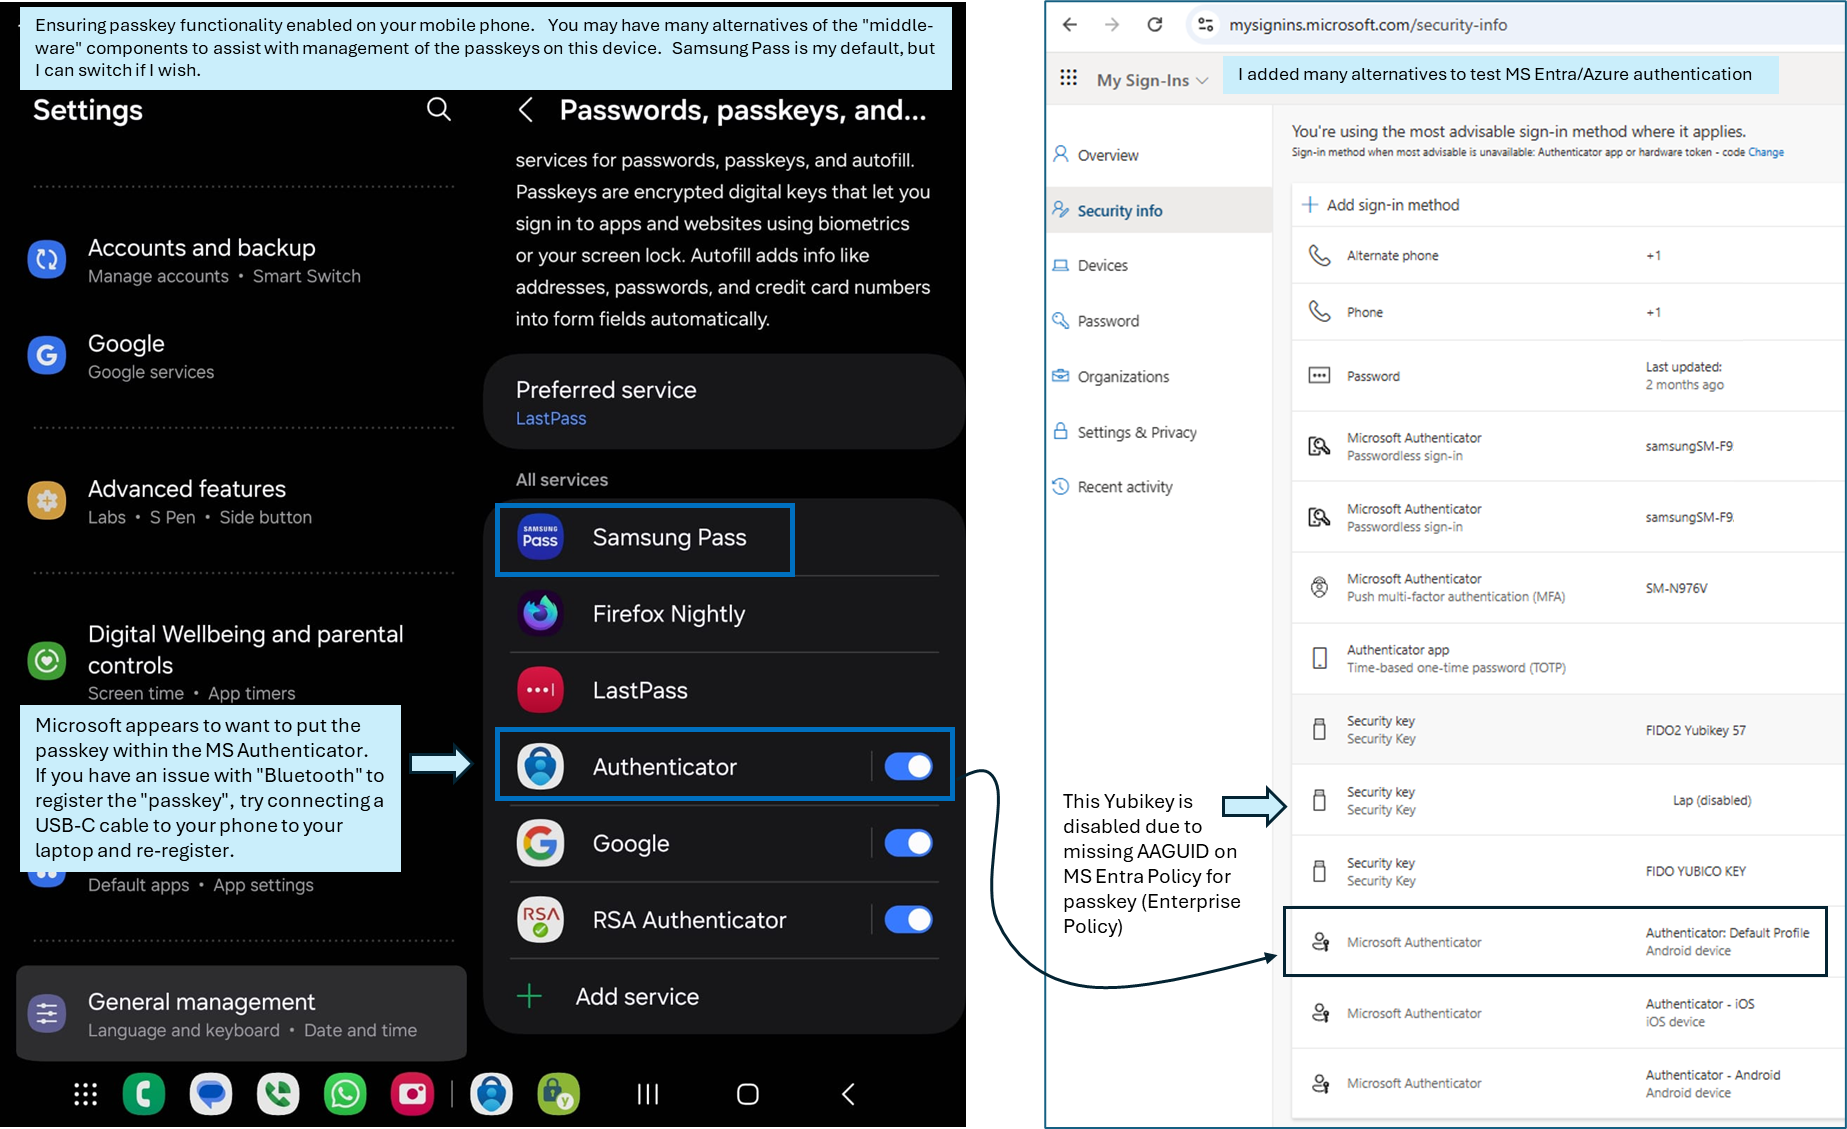
If you still have an issue with registration with Bluetooth, fall back to using USB-C on your mobile phone connected to your private workstation/laptop. Please ensure that you do have a “passkey” management middle-ware app on your phone enabled to work with the vendors’ website.

Example: Microsoft seems to prefer their Microsoft Authenticator to hold the “passkey” associated with your Microsoft email account (work or school or otherwise). The below image show I have many choices for the middle-ware application. OOTB on my Samsung mobile phone is Samsung Pass. But you can change this at will when you are registering your “passkey”. Recall that the actually “passkey” will still be stored in the hardware of the mobile device.

Within Microsoft Authenticator, when you select your MS email address (work/personal), you should be able to see a “passkey” option. My previous attempts at registration using Bluetooth failed, but when I used the USB-C cable, then I had no issue.

Benefits of Passkeys: Stop Man-in-the-Middle / Phishing Attacks

One of the primary advantages of using a passkey (certificate-based-authentication) over passwords, is to defeat the man-in-the-middle / phishing attacks.

You know those emails that your receive, that pretend to be from your bank, your CPA, or Microsoft/Google for your email. They have intentionally malformed URL addresses to trick you to enter your password into their own site, that have stolen vendor images to make it look “real”. Well, if you are tired or busy, and not paying attention, ouch, you have just put yourself at major risk by clicking that link and entering your credentials.

Lets stop this nonsense & risk now. Help your friends and family members as well.

Why this works? The magic is the industry has agreed on a “standard” to use public-private key functionality and make it more friendly for end-users to use with their laptop’s browsers and phones. Since this “standard” is fairly new, you will only see a few banks using it. I have only one bank of three using it. It is being rolled out at most global companies, e.g Google, Microsoft, etc.

How this works? The passkey’s private key remains on your device (phone/workstation/physical security key/tablet), the passkey public cert is ONLY on the one site you registered at. Only the correct public cert can verify the private key’s signature, making interception useless. Yea us!

Please be aware that passkeys (as a process) are still relative new for global usage, and this functionality is being rolled out. There are challenges that are being address for backup/replication but don’t let that stop you from adoption to enhance your own personal security.

The good:

I had great luck with using a physical security USB device, the Yubikey 5C NFC , for passkey(s), ECA certificates, and standard one-time token(s) (touch). Also, if I used an app or website on my mobile phone that supported passkeys, I had no challenges with registration and using passkeys with same phone. This was all good. I thought I should be able to do this same passkey registration with my laptop with any browser or integrate with my mobile phone as is mentioned in many online sites.

The bad:

However I became very frustrated. I wanted to use passkey(s) on my laptop/workstation natively or along with a mobile phone. Why was this so hard? I wanted this functionality for my email and for any other online work while I was sitting at my desk. I did not want to use the small screen on the mobile phone to conduct my business.

I would see these types of scary error messages when I attempt to register a passkey on my workstation.

I had to dive deeper and see why I had an issue with my workstations. An why with a slight change, I will continue to use my mobile phone or Yubikey for passkeys.

Testing Passkey (aka FIDO2) Functionality:

Pretest your workstation to see if you can use passkeys. Use the below site to test: https://webauthn.io/ Enter a random string in the edit box, click Register, then click Authenticate. If you have no issues, you are well on your way to using passkeys.

With the Firefox browser, you can try this second site. https://webauthn.bin.coffee/ It is a deeper review but shows a similar process with “Create Credential” and “Get Assertion”. If this passes, please continue.

Hardware TPM 2.0

My first failure, was due to using an older laptop/workstation. You must have a relatively new laptop that has TPM 2.0 in the BIOS. Unfortunately a BIOS upgrade will not resolve this. Passkey(s) require the newer hardware security functionality within TPM 2.0. Time to upgrade your laptop.


Check your version with MS Windows’ Device Manager or PowerShell command line, and type Get-TPM

My second issue was the OS I was using on my updated laptop/workstation that had TPM 2.0. Passkey architecture requires supported hardware (to store the key securely), middle-ware management software, and user interaction (via browser or other). For example, MS Windows OS version 10/11’s middle-ware management software is called “Windows Hello” (aka WebAuthn) that will interact between the browser (user) and the hardware (where the passkey is stored).

However, on my newest laptop, I am running MS Windows 2019 Standard OS, as I find it more stable for testing solutions. On this OS, “Windows Hello” feature set is not fully enabled. While I could enable it via MS Registry entries or a group policy (see below), I decided to stop here, and focus on the mobile phone authentication for the workstation. The underlying OS functionality will work as-is with passkeys on mobile phones, but there was a hitch.

Mobile Phone

As I reviewed through the online documentation and specs, it is clear that with a mobile phone (acting as the passkey storage with a built-in security chip) should be able to communicate to any workstation (public/private) and provide the passkey over Bluetooth when asked. However, seeing is believing, and I only was successful with passkey registration on my private workstations only after I trusted the mobile phone with the workstation.

Typically, on a workstation with MS Windows, you may use Bluetooth for keyboard/mouse/audio headsets. You may also use it for file transfer between the workstation and other devices, e.g. mobile phones. The FIDO2 architecture uses Bluetooth as well, but with their own protocol.

Before I trusted the phone with the workstation, I would see attempts to use my mobile phone from the workstation, but it would eventually fail. Perhaps there is an automated features that i needed to enabled that would allow this. I enabled Bluetooth trust between the mobile phone and the workstation prior to trying again.

Success!

If the application or website offers passkey(s) as authentication, please go ahead. Ignore any error/warning messages that may say your “device” (aka workstation/laptop) does not support passkey. Select “another device” if it is offered, then select your mobile phone. You should be able to progress and register a passkey on your phone.

Below are images from the phone, that are generated due to the Bluetooth “trust” with the workstation, when I select a passkey to be generated and stored on my mobile phone.

Now that your passkey is registered, you should be able to use any public workstation or other with your mobile phone, and not worry about your password being compromised. 🙂

Take-aways:

  1. Use passkey(s) as your primary authentication (if the website or app allows it)
    • When using your mobile phone, ensure Bluetooth is enabled and trusted to your non-public workstation (to assist with initial passkey registration)
    • Consider using a physical security key with PIN, to hold the passkeys. Ensure this device has USB-C and/or NFC to allow you to use it with any modern workstation/ipad/mobile phone.
  2. Use an authentication app (MS/Google/LastPass/Yubikey/Symantec VIP/RSA Auth/etc.) as secondary authentication option with or without your password .
    • Best if the site allow you to use only an Authenticator but most sites will require a password as 1st credential (at this time/ not perfect but better than just password alone).
    • Please note that you may be able to have as many authentication app as you like on some websites.
  3. Use your password and SMS text as a third option for authentication to have a minimal of two (2) factor authentication. This is the minimal two (2) factor. We want better.
  4. If you have only password authentication, use some form of password management tool, e.g. KeePass, LastPass, 1Password, etc. and make the password as long as possible, e.g. 100 characters. Let’s see someone brute force that. See below table of examples
ToolFeaturesStrengthsConcernsBest ForPricing
KeePassOpen-source, offline storage, extensive plugins, no cloud dependency.Highly secure, customiz-able.Manual syncing for multiple devices.Privacy-focused and advanced users.Free (open-source).
Text File Secured by VeraCryptOpen-source, offline storage, encrypted container for storing sensitive text files, open-source encryption tools.Fully offline, highly secure.Manual password entry; no automation.Privacy-focused users.Free (open-source).
LastPassCloud-based vault, password sharing, MFA, dark web monitoring.User-friendly interface.Previous data breaches.Personal and family use.Free version; & Premium version
DashlaneCloud-based vault,
Password generator, VPN, dark web monitoring, autofill for payment details.
Advanced security features.Expensive compared to others.All-in-one solution seekers.Free version (limited); & Premium version
1PasswordCloud-based vault,
Travel mode, item-specific sharing, password health analysis, advanced MFA support.
Great for families and teams.No free plan (trial available).Families and advanced users.No Free version
BitwardenCloud-based vault, Open-source, self-hosting option, MFA, password generator.Transparent and affordable.Less intuitive interface.Tech-savvy and budget-conscious.Free version; & Premium version
KeeperZero-knowledge encryption, secure file storage, breach monitoring, advanced MFA.Enterprise-grade security.More expensive than alternatives.Professional and businesses.No Free version
RoboFormSimple password management, secure sharing, offline access.Affordable and reliable.Limited advanced features.Casual users.Free version; & Premium version
NordPassPassword health tools, zero-knowledge encryption, cross-device sync.User-friendly, good for beginners.Fewer advanced features.Users in Nord ecosystem.Free version; & Premium version
Zoho VaultPassword sharing, role-based access, Zoho app integration, MFA support.Affordable for teams.Less intuitive for individual users.Small businesses and Zoho users.Free personal plan; & Paid version

Other useful knowledge found during research

MS O365 Enable Passkey Functionality

This was interesting from an administrative view. There was only one type of passkey functionality for MS O365, and it was buried within the MS Authenticator. Now it looks like there is native support as well.

To enable Passkey (FIDO2) within O365, we had to go the admin console and enable four (4) switches.

Firefox Browser Debugging

It is impressive to see many parameters for Firefox to help isolate an issue.

Passkey versus SSH Key Table

I wanted to compare the similarities and the differences between passkey architecture and ssh keys (used for many years). This table summarizes the distinctions and overlaps between passkeys (a modern, browser-driven standard for web authentication) and SSH keys (a traditional tool for server authentication). This may help others to see how the evolution has progressed from behind the scenes with servers to public use with browsers.

Specs to review

https://w3c.github.io/webauthn

Expired Certs? Oh My!

How to Avoid the SSL Expiration Apocalypse

You’re minding your own business, sipping coffee, feeling invincible—when BAM! The website goes down. The boss storms in like an angry bear who just lost Wi-Fi. The culprit? An expired SSL certificate. Congratulations, you’ve just unlocked the IT version of public humiliation.

But fear not! The ssl-cert-expiration-date-check script is here to save you from a life of shame and awkward team meetings. Think of it as the superhero you never knew you needed, armed with OpenSSL and a knack for keeping your certificates alive and kicking.

What’s This?

SSL monitoring via bash shell. Here’s how it works:

  • It reads a list of FQDNs or IPs (fancy IT speak for “things you probably Googled how to find”) from a file named fqdn_list.txt.
  • It interrogates your endpoints like a bad cop in a detective movie, using OpenSSL binary to spill the beans on their SSL certificates.
  • It then writes the juicy details into certs_info.csv—because nothing says “I’m a professional” like a CSV file with MS Excel.

Boom. You now know when your certificates will expire. No more flying blind. No more angry bosses. No more soul-crushing outages.

Why Should You Care?

Let me paint you a picture: An expired SSL certificate means users see a terrifying “This site is NOT secure” warning. It’s basically the internet screaming, “Run away!” Your customers? Gone. Your reputation? Sinking faster than your confidence in this job.

But this script? It’s the anti-drama. It supports everything: HTTPS, LDAPS, JDBC/S, and even those obscure protocols no one dares to ask about. It logs every certificate—server, intermediate, maybe even root CA certificates if they’re feeling generous. It’s like an all-you-can-eat buffet of SSL info.

Did You Know?

  • Some certificates, like rebellious teenagers, don’t come pre-installed in your keystore. You’ve got to manually invite them to the party.
  • On Windows, this means opening certlm.msc (don’t worry, it’s not as scary as it sounds).
  • If you’re in Java Land, you’ll need to charm the keytool utility. It’s like convincing a cat to sit still—it’s tricky, but doable.

How to Become an SSL Wizard

  • Step 1: Open a text editor and create fqdn_list.txt. Add all your endpoints and ports, one per line. It’s like making a party guest list, but with less glitter.
  • Step 2: Run the script. Sit back. Look cool.
  • Step 3: Open the certs_info.csv file. Admire your work. Maybe print it out and frame it for the office wall.

The Moral of the Story

Neglect your SSL certificates, and the internet will publicly shame you. But with the ssl-cert-expiration-date-check script, you’ll avoid the chaos, the browser warnings, and the boss’s death stare.

So, download this script, save yourself, and become the hero your IT department deserves. Because nothing says “I’ve got this” like preventing a preventable disaster. Now, go forth and conquer the world of SSL certificates—preferably before your coffee gets cold.

The Location

https://github.com/anapartner-com/ssl-cert-expiration-date-check

View the Readme, play with the scripts, provide feedback. Integrate this process with your SaaS monitoring solutions, e.g. Syslog (with Splunk), Broadcom DX02 (APM), Grafana, Dynatrace, etc. Or use remote ssh to execute the process to secure internal network segments to query those certs as well.

The Magic of openssl binary

openssl s_client -connect "$FQDN:$PORT" -showcerts 2>/dev/null > "temp_output.txt"


EXPIRATION_DATE=$(openssl x509 -enddate -noout -in "$CERT_FILE" 2>/dev/null | cut -d= -f2)
SUBJECT_NAME=$(openssl x509 -subject -noout -in "$CERT_FILE" 2>/dev/null | sed 's/subject= //')
SERIAL_NUMBER=$(openssl x509 -serial -noout -in "$CERT_FILE" 2>/dev/null | cut -d= -f2)

We use the openssl s_client process to connect and return all possible certs from the endpoints’ IP or FQDN with its port and save this information to a temporary file for us to review for the metadata.

We obviously want “enddate”, to find the expiration date of the certificates. But we also want both the “subject (aka CN)” and “serial” of the certificates to avoid the all-too-common challenge during rotation of certificates where we have the SAME name (subject/CN) for the same root ca cert. This is a very annoying challenge and will add unnecessary effort during RCA (root-cause-analysis) efforts to identify the full certificate chain. The “serial” number will help us avoid this confusion.

Streamlining with LetsEncrypt Wildcard Certificates and Automated Validation

Our goal is to move away from using self-signed certificates, often supplied by various software vendors and Kubernetes deployments, in favor of a unified approach with a single wildcard certificate covering multiple subdomains. This strategy allows for streamlined updates of a single certificate, which can then be distributed across our servers and projects as needed.

We have identified LetsEncrypt as a viable source for these wildcard certificates. Although LetsEncrypt offers a Docker/Podman image example, we have discovered an alternative that integrates with Google Domains. This method automates the entire process, including validation of the DNS TXT record and generation of wildcard certificates. It’s important to note that Google Domains operates independently from Google Cloud DNS, and its API is limited to updating TXT records only.

In this blog post, we will concentrate on how to validate the certificates provided by LetsEncrypt using OpenSSL. We will also demonstrate how to replace self-signed certificates with these new ones on a virtual appliance.

View the pubkey of the LetsEncrypt cert.pem and privkey.pem file to confirm they match

Note: LetsEncrypt private keys are now key-type = ECDSA by default. You may still request RSA key-type.

openssl x509 -noout -pubkey -in cert.pem

openssl pkey -pubout -in privkey.pem

When key-type = rsa, we can use either openssl validation method (rsa with md5 or pkey with pubout)

openssl x509 -noout -modulus -in cert.pem | openssl md5

openssl rsa  -noout -modulus -in privkey.pem | openssl md5

Validate DNS & Dates of the cert, chain, fullchain pem files

openssl x509 -text -noout -in cert.pem | grep -e DNS -e 'Not Before:' -e 'Not After :' -e 'Subject: C'

while openssl x509 -noout -text | grep -e Certificate: -e Issuer: -e DNS -e 'Not Before:' -e 'Not After :' -e 'Subject: C' ; do :; done < chain.pem 2>/dev/null

while openssl x509 -noout -text | grep -e Certificate: -e Issuer: -e DNS -e 'Not Before:' -e 'Not After :' -e 'Subject: C' ; do :; done < fullchain.pem 2>/dev/null

Download the current trusted public root CA cert from LetsEncrypt

We need to download this root CA cert for solutions, appliances, and on-prem Kubernetes Clusters that do NOT have these root CA certs in their existing keystores.

curl -sOL https://letsencrypt.org/certs/isrgrootx1.pem

Validate the cert.pem file with the public root CA cert and the provided chain.pem file

Will return an “OK” response if valid. CA certs order is important, if reversed this process will fail. Validation still fails if we only have chain.pem or fullchain.pem (see image below) without the correct public root CA cert from LetsEncrypt. Note: This public root CA cert is typically provided in updated modern browsers. Note2: While the fullchain.pem does have a CA cert with the CN = ISRG Root X1, this does NOT appear to be the correct one based on the error reported, so we have downloaded the correct CA cert to be used with the same CN name of ISRG Root X1 (see following images below)

openssl verify -CAfile <(cat isrgrootx1.pem chain.pem) cert.pem

Combine cert.pem with the public root CA cert and chain.pem for a complete chain cert in the CORRECT order.

Important Note: cert.pem MUST be first in this list otherwise validation will fail. Please note that there are two (2) root CA certs with the same CN, that may cause some confusion when validating the chain.

cat cert.pem isrgrootx1.pem chain.pem > combined_chain_with_cert.pem

Validate certs with openssl server process and two (2) terminal ssh sessions/windows

1st terminal session – run an openssl server (via openssl s_server) on port 9443 (any open port). The -www switch will send a status message back to the client when it connects. This includes information about the ciphers used and various session parameters. The output is in HTML format so this option will normally be used with a web browser.

openssl s_server -key privkey.pem -cert combined_chain_with_cert.pem -accept 9443 -www

2nd terminal session – run openssl s_client and curl with the combined chain cert to validate. Replace the FQDN with your LetsEnscrypt domain in the wildcard cert. Example below FQDN is training.anapartner.net. You may also use a browser to access the openssl s_server web server with a FQDN.

true | openssl s_client -connect localhost:9443 -CAfile combined_chain_with_cert.pem

curl -v --cacert combined_chain_with_cert.pem --resolve training.anapartner.net:9443:127.0.0.1 https://training.anapartner.net:9443

CERTBOT deployment via PODMAN

Example of using the official Certbot image with podman. We recommend using multiple -d switches with *.subdomain1.domain.com to allow a single cert be used for many of your projects. Reference of this deployment

podman run --rm -it \
-v "$(pwd)/etc-output:/etc/letsencrypt:z" \
-v "$(pwd)/var-output:/var/lib/letsencrypt:z" \
 certbot/certbot certonly --manual -d wildcard.domain.com \
-d *.subdomain1.domain.com \
-d *.subdomain2.domain.com \
-d *.subdomain3.domain.com \
-d *.subdomain4.domain.com

A version of podman with the Google Domain API TXT integration. We use variables for reuse of this code for various testing domains. This docker image will temporarily create the Google Domain TXT records via a REST API, that are needed for Certbot DNS validation, then the process will remove the TXT records. There is no manual interaction required. We use this process with a bash shell script to run as needed or via scheduled events.

podman run --rm \
  -v ${LETSENCRYPT}/var/lib/letsencrypt:/var/lib/letsencrypt:z \
  -v ${LETSENCRYPT}/etc/letsencrypt:/etc/letsencrypt:z \
  -v ${LETSENCRYPT}/var/log/letsencrypt:/var/log/letsencrypt:z \
  --cap-drop=all \
  ghcr.io/aaomidi/certbot-dns-google-domains:latest \
  certbot certonly  \
  --authenticator 'dns-google-domains' \
  --dns-google-domains-credentials /var/lib/letsencrypt/dns_google_domains_credentials_${domain}.ini \
  --non-interactive --agree-tos -m dns@${domain} \
  --server 'https://acme-v02.api.letsencrypt.org/directory' \
  --non-interactive \
  --dns-google-domains-zone "${domain}" \
  -d "${CN_OF_TLS_DOMAIN}" \
  -d "*.$subdomain01.$domain" \
  -d "*.$subdomain02.$domain" \
  -d "*.$subdomain03.$domain" \
  -d "*.$subdomain04.$domain" \
  -d "*.$subdomain05.$domain" \
  -d "*.$subdomain06.$domain" \
  -d "*.$subdomain07.$domain" \
  -d "*.$subdomain08.$domain" \
  -d "*.$subdomain09.$domain" \
  -d "*.$subdomain10.$domain" \
  -d "*.$subdomain11.$domain" \
  -d "*.$subdomain12.$domain"

Replace Identity Suite vApp Apache Certificate with LetsEncrypt

We see tech notes and an online document but wanted to provide a cleaner step by step process to update the Symantec IGA Virtual Appliance certificates for the embedded Apache HTTPD service under the path /opt/CA/VirtualAppliance/custom/apache-ssl-certificates

# Collect the generated LetsEncrypt certs via certbot, save them, scp to the vApp host, and then extract them

tar -xvf letsencrypt-20231125.tar


# View the certs

ls -lart


# Validate LetEncrypt cert via pubkey match between private key and cert

openssl x509 -noout -pubkey -in cert.pem
openssl pkey -pubout -in privkey.pem


# Download the latest LetsEncrypt public root CA cert

curl -sOL https://letsencrypt.org/certs/isrgrootx1.pem


# Validate a full chain with root with cert (Note: order is important on cat process)

openssl verify -CAfile <(cat isrgrootx1.pem chain.pem) cert.pem


# Create a full chain with root cert and LetsEncrypt chain in the correct ORDER

cat cert.pem isrgrootx1.pem chain.pem > combined_chain_with_cert.pem


# Move prior Apache HTTPD cert files

mv localhost.key localhost.key.original
mv localhost.crt localhost.crt.original


# Link the new LetsEncrypt files to same names of localhost.XXX

ln -s privkey.pem localhost.key
ln -s combined_chain_with_cert.pem localhost.crt


# Restart apache (httpd)

sudo systemctl restart httpd


# Test with curl with the FQDN name in the CN or SANs of the cert, e.g. training.anapartner.net

curl -v --cacert combined_chain_with_cert.pem --resolve training.anapartner.net:443:127.0.0.1 https://training.anapartner.net:443


# Test with browser with the FQDN name

Example of integration and information reported by browser

View of the certificate as shown with a CN (subject) = training.anapartner.net

A view of the SANS wildcard certs that match the FQDN used in the browser URL bar of iga.k8s-training-student01.anapartner.net

Example of error messages from Apache HTTPD service’s log files if certs are not in correct order or validate correctly. One message is a warning only, the other message is a fatal error message about the validation between the cert and private key do not match. Use the pubkey check process to confirm the cert/key match.

[ssl:warn] [pid 2206:tid 140533536823616] AH01909: CA_IMAG_VAPP:443:0 server certificate does NOT include an ID which matches the server name
[ssl:emerg] [pid 652562:tid 140508002732352] AH02565: Certificate and private key CA_IMAG_VAPP:443:0 from /etc/pki/tls/certs/localhost.crt and /etc/pki/tls/private/localhost.key do not match

TLS Secrets update in Kubernetes Cluster

If your Kubernetes Cluster is on-prem and does not have access to the internet to validate the root CA cert you may decided to use the combine_chain_with_cert.pem when building your Kubernetes Secrets. With Kubernetes Secrets you must delete then re-add the Secret as there are no current update process for Secrets.

CERTFOLDER=~/labs/letsencrypt
CERTFILE=${CERTFOLDER}/combined_chain_with_cert.pem
#CERTFILE=${CERTFOLDER}/fullchain.pem
KEYFILE=${CERTFOLDER}/privkey.pem
INGRESS_TLS_SECRET=anapartner-dev-tls
NAMESPACE=monitoring


NS=${NAMESPACE}
kubectl -n ${NS} get secret ${INGRESS_TLS_SECRET} 2>&1 > /dev/null
if [ $? != 0 ]; then
echo ""
echo "### Installing TLS Certificate for Ingress"
kubectl -n ${NS} create secret tls ${INGRESS_TLS_SECRET} \
  --cert=${CERTFILE} \
  --key=${KEYFILE}
fi


Ingress Rule via yaml:
  tls:
  - hosts:
    - grafana.${INGRESS_APPS_DOMAIN}
    secretName: ${INGRESS_TLS_SECRET}


helm update:
--set grafana.ingress.tlsSecret=${INGRESS_TLS_SECRET} 

Symantec Directory use of LetsEncrypt certs

Symantec (CA) Directory requires certificates to have a purpose of ” SSL client: Yes and SSL server: Yes” and be in X.509 PEM format. Fortunate for us, we can validate this is true and leverage our LetsEncrypt certs for the DSAs. If we compare the use of dxcertgen (the included binary to generate certificates within CA Directory) and LetsEncrypt, we can see they only differ for two (2) purposes that do not impact our use.

openssl x509 -noout -purpose -in cert.pem
openssl x509 -noout -ext KeyUsage -in cert.pem
openssl x509 -noout -ext extendedKeyUsage -in cert.pem

The below section from the online documentation mentions the purpose of a certificate to be used by Symatnec Directory. It mentioned using either DXcertgen or openssl. We can now add in LetsEncrypt certs as well to be used.

One statement caught our eye that was not quite accurate was that a certificate used on one DSA could not be used for another DSA. We can see if we compare the DSAs provided by CA Directory for the provisioning servers data tier (Identity Suite/Identity Manager), there is no difference between them, including subject name. Due to the fact that the subject (CN) has the same name for all five (5) DSAs (data/router), if a Java JNDI call is made for an LDAP call to the DSAs, the LDAP hostname validation must be disabled. (see below)

-Dcom.sun.jndi.ldap.object.disableEndpointIdentification=true

Symantec PAM use of LetsEncrypt Certs

We must use key type of RSA for any cert with Symantec PAM. This process is fairly straightforward to update the certificates. Access the PAM UI configuration, select the menu of: Configuration / Security / Certificates. Join the cert.pem and the privkey.pem files together, in this order, with cat or notepad.

Challenge/Resolution: Please edit the joined file and add the string “RSA to the header/footer of the private key provided by LetsEncrypt. Per Broadcom tech note: 126692, “PAMs source code is expecting that RSA based Private Keys start with “—–BEGIN RSA PRIVATE KEY—–” header and have a matching footer. See example below.

Select “Certificate with Private key” with X509 (as other option), then click “Choose File” button to select the combined cert/privatekey pem file. We are not required to have a destination filename nor passphrase for the LetsEncrypt certs. Click Upload button.

We should receive a confirmation message of “Confirmation: PAM-CM-0349: subject=CN = training.anapartner.net has been verified.”

The error message “PAM-CM-0201: Verification Error Can not open private key file” will occur if using keytype of RSA or ECDSA and the default header/footer does not contain a required string for PAM to parse. If we attempt to use ECDSA keytype, we would receive a similar PAM-CM-0201 error message after updating the header/footer. So please regenerate the LetsEncrypt certs with keytype=RSA.

Next steps, after the certificate and private key have been loaded into Symantec PAM, please use the “Set” menu option to assign this certificate as primary. We will click verify button first, to confirm the certificate is functioning correctly.

We should receive a confirmation message for the file ” Confirmation: PAM-CM-0346: cert_with_key_only_for_pam_app.crt has been verified“.

Finally, we will click “Accept” button, and allow the PAM appliance to restart. Click “Yes” when asked to restart the appliance.

View the updated PAM UI with the LetsEncrypt Certs.

ERROR Messages

If you have received any of the below error messages during use of any java process, e.g. J2EE servers (JBOSS/Wildfly), you have pushed beyond the solution’s vendor ability to manage new features provided in LetsEncrypt certs. You will need to regenerate them with the type of RSA, instead of default of elliptical certs.

UNKNOWN-CIPHER-SUITE
ERR_SSL_VERSION_OR_CIPHER_MISMATCH
SSLHandshakeException: no cipher suites in common
Ignore unavailable extension
Ignore unknown or unsupported extension

Use the below processes to help you identify the root cause of your issue.

JAVA_OPTS="$JAVA_OPTS -Djavax.net.debug=ssl:handshake:verbose "

curl -kv https://bastion-host.sso-training-student01.anapartner.net:8443/iam/siteminder/adminui

true | openssl s_client -cipher HIGH -connect bastion-host.sso-training-student01.anapartner.net:8443

Example of using podman to generate wild card certs with RSA keytype.

# RSA keytype is needed for SM Admin UI and PAM App - Recommend keep this as default

export KEYTYPE=rsa

podman run --rm --name letsencrypt \
-v ${LETSENCRYPT}/var/lib/letsencrypt:/var/lib/letsencrypt:z \
-v ${LETSENCRYPT}/etc/letsencrypt:/etc/letsencrypt:z \
-v ${LETSENCRYPT}/var/log/letsencrypt:/var/log/letsencrypt:z \
--cap-drop=all \
ghcr.io/aaomidi/certbot-dns-google-domains:latest \
certbot certonly \
--authenticator 'dns-google-domains' \
--dns-google-domains-credentials /var/lib/letsencrypt/dns_google_domains_credentials_${TLS_DOMAIN}.ini \
--non-interactive --agree-tos -m dns@${TLS_DOMAIN} \
--server 'https://acme-v02.api.letsencrypt.org/directory' \
--non-interactive \
--key-type ${KEYTYPE} \
--dns-google-domains-zone \"${TLS_DOMAIN}\" \
-d \"${CN_OF_TLS_DOMAIN}\" \
-d \"*.${GCP_TRAINING_NAME}01.${TLS_DOMAIN}\" \

Java Keystores

Create an ‘RSA’ type JKS and P12 Keystore using LetsEncrypt certs.

The below example is a two (2) steps process that will create a p12 keystore first with the cert.pem and privkey.pem files. Then, a second command will convert the p12 keystore to the older JKS keystore format. You may use these in any Java process, e.g.J2EE and/or Tomcat platform.


openssl pkcs12 -export -inkey privkey.pem -in cert.pem -name tomcat -out keyStore.p12 -password pass:changeit


keytool -v -importkeystore -srckeystore keyStore.p12 -srcstoretype PKCS12 -srcstorepass changeit -destkeystore keyStore.jks -deststoretype JKS -deststorepass changeit -keyalg RSA -noprompt

Secure Application Introspection

Locate “the good, the bad, and the ugly” data with a transparent proxy.

Have you been frustrated with various enterprise/cloud solutions’ APIs implementation or documentation where a single case-sensitive data field entry delays progress? Does the solution have undocumented features for older client tools? Do you wish to know what your mobile apps or laptop sends to the internet?

Utilizing a proxy can help with all the above, and if the process is quick and straightforward, so much the better.

Typically for a proxy, there may be quite a bit of effort and steps. You may need to modify a client host/mobile phone to redirect web traffic with OS environmental variables of HTTP_PROXY and HTTPS_PROXY or adjustment of the underlying OS network/iptables. Prior, we typically set up the open-source Jmeter proxy with the OS environment variables to capture secure traffic data. This process works well for most applications. Additionally, the Firefox browser allows manual modification using a proxy without dependence on the OS environment settings if we wish to capture the user experience and any data challenges.

The example below of modifying a Firefox browser to use a “manual proxy configuration” instead of system/auto configurations.

To ensure accurate capture of web traffic submissions, a more thorough method is needed as the above process may fail if client tools or mobile apps cannot detect OS environmental variables.

We have found a perfect combination within the open-source tool of MITMproxy with podman and the embedded VPN feature of WireGuard.

The process in six (6) steps:

  1. Deployment of the WireGuard VPN client on the client host (MS Win/Linux/Mobile)
  2. Deployment of MITMproxy using podman (or docker) with WireGuard mode/configuration
  3. Edit the wireguard.conf file to have the correct public IP address and import this file to the WireGuard VPN client and establish the VPN connection.
  4. Copy the mitmproxy-ca-cert.cer to the client component Java or OS keystore (if needed) as a trusted CA cert.
  5. Open the MITMproxy Web UI or monitor the command line dashboard
  6. Execute your test on the client host and view the results in the MITMproxy Web UI for both request and response.

MITMproxy UI with WireGuard mode enabled.

The WireGuard client configuration will be provided in three (3) places: the MITMproxy logs (podman logs mitmproxy), the text file wireguard.conf (if podman/docker volumes are enabled), and the MITMproxy UI. The QR code is enabled for mobile phone use, but since the public IP address provided is not correct in this view, you will need to manually edit this configuration on your mobile phone during those use-cases to have the correct endpoint IP address.

MITMproxy UI with standard proxy configuration mode.

Bash Script:

Script to deploy MITMproxy with podman on a linux OS with two (2) configurations: Wireguard mode for any client applications that do not honor HTTP_PROXY/HTTPS_PROXY and Standard proxy mode. This bash script allows a shared volume to use the SAME certs to avoid managing different certs upon restart of the container.

#!/bin/bash
######################################################################################
#
#  Deploy MITMproxy with two (2) configurations:
#
#     MITMProxy with WireGuard mode enabled (UDP 51820) and Web UI (TCP 8081)
#     MITMProxy with standard proxy enabled (TCP 9080) and Web UI (TCP 9081)
#
#  Notes:  Use podman exec to check path and env variables
#    - Binaries:  dnf -y install podman 
#    - Use shared folder to avoid having two (2) different configuration files for both copies
#    - Do not forget the :z for -v volumes to avoid permissions issues
#    - Do not forget quotes around env -e variables
#    - Use --rm as needed
#    - Use this switch as needed, but do not leave it on:   --log-level debug \
#
#   Basic:  podman run -it -v /tmp/mitmproxy/:/home/mitmproxy/.mitmproxy:z -p 8080:8080 mitmproxy/mitmproxy
#   Logs:   podman logs mitmproxy-wireguard
#   Shell:  podman exec -it -u root mitmproxy bash
#
#  Options Ref.  https://docs.mitmproxy.org/stable/concepts-options/
#   - added stream_large_bodies=10m to lower impact to mitmproxy due
#       to possible large json/xml payloads 
#
#  ANA 07/2023
#
######################################################################################

MITMPROXY_HOMEPATH=/tmp/mitmproxy
echo ""
echo "You may delete the shared folder of ${MITMPROXY_HOMEPATH}"
echo "to remove prior configuration of mitmproxy certs & wireguard.conf files"
echo ""
#sudo rm -rf ${MITMPROXY_HOMEPATH}

mkdir -p ${MITMPROXY_HOMEPATH}
chmod -R 777 ${MITMPROXY_HOMEPATH}
ls -hlrt ${MITMPROXY_HOMEPATH}

echo ""
echo " Starting mitmproxy-wireguard proxy "
podman rm mitmproxy-wireguard -f  &>/dev/null
podman run -d -it --name mitmproxy-wireguard \
   -p 51820:51820/udp -p 8081:8081 \
   -l mitmproxy \
   -v ${MITMPROXY_HOMEPATH}:/home/mitmproxy/.mitmproxy:z  \
    docker.io/mitmproxy/mitmproxy \
    mitmweb --mode wireguard --ssl-insecure  --web-host 0.0.0.0 --web-port 8081 --set stream_large_bodies=10m


echo ""
echo " Starting mitmproxy-default proxy "
podman rm mitmproxy-default -f  &>/dev/null
podman run -d -it --name mitmproxy-default \
    -p 9080:9080 -p 9081:9081 \
    -l mitmproxy  \
    -v ${MITMPROXY_HOMEPATH}:/home/mitmproxy/.mitmproxy:z  \
     docker.io/mitmproxy/mitmproxy \
     mitmweb --set listen_port=9080 --web-host 0.0.0.0 --web-port 9081

echo ""
echo ""
echo "###############################################################################"
echo ""
echo " Running Podman Containers for MITMproxy"
sleep 5
podman ps -a --no-trunc | grep -i mitmproxy
echo ""
echo "###############################################################################"
podman logs  mitmproxy-default
echo ""
echo " Monitor the mitmproxy-default UI @ http://$(curl -s ifconfig.me):9081 "
echo "###############################################################################"
podman logs  mitmproxy-wireguard
echo ""
echo " Monitor the mitmproxy-wireguard UI @ http://$(curl -s ifconfig.me):8081 "
echo "###############################################################################"
echo ""
echo "Please update the mitmproxy wireguard client configuration endpoint address to:  $(curl -s ifconfig.me)"
echo ""
echo "###############################################################################"
echo ""

MITMproxy CERTS:

Add mitmproxy-ca-cert to the trusted root certs folder on your client host OS keystore (MS Win: certlm.msc) and/or if there is a java keystore for the client tool, please add the mitmproxy-ca-cert.cer as a trusted cert. keytool -import -trustcacerts -file mitm-ca-proxy.cer -alias mitmproxy -keystore capam.keystore

WireGuard client configuration:

To ensure that only selected web traffic is monitored through wireguard VPN to mitmproxy, make changes to the wireguard.conf file before importing it. Specifically, update the AllowedIPs address field to include a single IP address. Additionally, modify the endpoint field to direct traffic to the public IP address of the mitmproxy host on UDP port 51820. If deploying mitmproxy on AWS or other cloud hosts, confirm that the firewall/security groups permit TCP 8080, 8081, 9080, 9091, and UDP 51820. Once you have activated the WireGuard client, test your processes on the host and monitor the MITMproxy UI for updates.

An example of data captured between two (2) CLI tools. These CLI tools did not honor the OS environmental variables of HTTP_PROXY & HTTPS_PROXY. Using the MITMproxy with WireGuard process, we can now confirm the delta submission behavior that was masked by the CLI tools. This process was useful to confirm that MS Powershell was removing special characters for a password string, e.g. ! (exclamation mark).

Example of script deploying two (2) MITMproxy containers

Adding wildcard certificates to Virtual Appliance

While preparing to enable a feature within the Identity Suite Virtual Appliance for TLS encryption for the Provisioning Tier to send notification events, we noticed some challenges that we wish to clarify.

The Identity Suite Virtual Appliance has four (4) web services that use pre-built self-signed certificates when first deployed. Documentation is provided to change these certificates/key using aliases or soft-links.

One of the challenges we discovered is the Provisioning Tier may be using an older version of libcurl & OpenSSL that have constraints that need to be managed. These libraries are used during the web submission to the IME ETACALLBACK webservice. We will review the processes to capture these error messages and how to address them.

We will introduce the use of Let’s Encrypt wildcard certificates into the four (4) web services and the Provisioning Server’s ETACALLBACK use of a valid public root certificate.

The Apache HTTPD service is used for both a forward proxy (TCP 443) to the three (3) Wildfly Services and service for the vApp Management Console (TCP 10443). The Apache HTTPD service SSL certs use the path /etc/pki/tls/certs/localhost.crt for a self-signed certificate. A soft-link is used to redirect this to a location that the ‘config’ service ID has access to modify. The same is true for the private key.

/etc/pki/tls/certs/localhost.crt -> /opt/CA/VirtualAppliance/custom/apache-ssl-certificates/localhost.crt

/etc/pki/tls/private/localhost.key -> /opt/CA/VirtualAppliance/custom/apache-ssl-certificates/localhost.key

A view of the Apache HTTPD SSL self-signed certificate and key.

The three (3) Wildfly services are deployed for the Identity Manager, Identity Governance and Identity Portal components. The configuration for TLS security is defined within the primary Wildfly configuration file of standalone.xml. The current configuration is already setup with the paths to PKCS12 keystore files of:

/opt/CA/VirtualAppliance/custom/wildfly-ssl-certificates/caim-srv

/opt/CA/VirtualAppliance/custom/wildfly-ssl-certificates/caig-srv

/opt/CA/VirtualAppliance/custom/wildfly-ssl-certificates/caip-srv

A view of the three (3) Wildfly PKCS12 keystore files and view of the self-signed cert/key with the pseudo hostname of the vApp host.

Provisioning Server process for TLS enablement for IME ETACALLBACK process.

Step 1. Ensure that the Provisioning Server is enabled to send data/notification events to the IME.

Step 2. Within the IME Management Console, there is a baseURL parameter. This string is sent down to the Provisioning Server upon restart of the IME, and appended to a list. This list is viewable and manageable within the Provisioning Manager UI under [System/Identity Manager Setup]. The URL string will be appended with the string ETACALLBACK/?env=identityEnv. Within this Provisioning Server, we can manage which URLs have priority in the list. This list is a failover list and not load-balancing. We have the opportunity to introduce an F5 or similar load balancer URL, but we should enable TLS security prior.

Step 3. Added the public root CA Cert or CA chain certs to the following location. [System/Domain Configuration/Identity Manager Server/Trusted CA Bundle]. This PEM file may be placed in the Provisioning Server bin folder with no path or may use a fully qualified path to the PEM file. Note: The Provisioning Server is using a version of openssl/libcurl that will report errors that can be managed with wildcard certificates. We will show the common errors in this blog entry.

Let’sEncrypt https://letsencrypt.org/ Certificates

Let’sEncrypt Certificates offers a free service to build wildcard certificates. We are fond of using their DNS method to request a wildcard certificate.

sudo certbot certonly --manual  --preferred-challenges dns -d *.aks.iam.anapartner.dev --register-unsafely-without-email

Let’s Encrypt will provide four (4) files to be used. [certN.pem, privkeyN.pem, chainN.pem, fullchainN.pem]

cert1.pem   [The primary server side wildcard cert]

privkey1.pem   [The primary server side private key associated with the wildcard cert]

chain1.pem   [The intermediate chain certs that are needed to validate the cert1 cert]

fullchain1.pem    [two files together in the correct order of  cert1.pem and chain1.pem.]  

NOTE:  fullchain1.pem is the file you typically would use as the cert for a solution, so the solution will also have the intermediate CA chain certs for validation]

Important Note: One of the root public certs was cross-signed by another root public cert that expired. Most solutions are able to manage this challenge, but the provisioning service ETACALLBACK has a challenge with an expired certificate, but there are replacements for this expired certificate that we will walk through. Ref: https://letsencrypt.org/docs/dst-root-ca-x3-expiration-september-2021/

Create a new CA chain PEM files for LE (Let’s Encrypt) validation to use with the Provisioning Server.

CERT=lets-encrypt-r3.pem;curl -s -O -L https://letsencrypt.org/certs/$CERT ; openssl x509 -text -noout -in $CERT | grep -i -e issue -e not -e subject ; ls -lart $CERT

CERT=isrgrootx1.pem;curl -s -O -L https://letsencrypt.org/certs/$CERT ; openssl x509 -text -noout -in $CERT | grep -i -e issue -e not -e subject ; ls -lart $CERT

CERT=isrg-root-x2.pem;curl -s -O -L https://letsencrypt.org/certs/$CERT ; openssl x509 -text -noout -in $CERT | grep -i -e issue -e not -e subject ; ls -lart $CERT

cat lets-encrypt-r3.pem isrgrootx1.pem isrg-root-x2.pem > combine-chain-letsencrypt.pem

Replacing the certificates for the vApp Apache, Wildfly (3), and Provisioning Server (ETACALLBACK)

Apache HTTPD Service (TCP 443/10443) (May need to reboot vApp)

cp -r -p  /home/config/aks.iam.anapartner.dev/fullchain2.pem /opt/CA/VirtualAppliance/custom/apache-ssl-certificates/localhost.crt

cp -r -p  /home/config/aks.iam.anapartner.dev/privkey2.pem  /opt/CA/VirtualAppliance/custom/apache-ssl-certificates/localhost.key

Wildfly Services (TCP 8443/8444/84445) for IM, IG, and IP (restart services after update)

View of the Wildfly (Java) services for IM, IG, and IP (restart services after update)
openssl pkcs12 -export -inkey /home/config/aks.iam.anapartner.dev/privkey2.pem -in /home/config/aks.iam.anapartner.dev/fullchain2.pem -out /opt/CA/VirtualAppliance/custom/wildfly-ssl-certificates/caim-srv -password pass:changeit
restart_im

openssl pkcs12 -export -inkey /home/config/aks.iam.anapartner.dev/privkey2.pem -in /home/config/aks.iam.anapartner.dev/fullchain2.pem -out /opt/CA/VirtualAppliance/custom/wildfly-ssl-certificates/caig-srv -password pass:changeit
restart_ig

openssl pkcs12 -export -inkey /home/config/aks.iam.anapartner.dev/privkey2.pem -in /home/config/aks.iam.anapartner.dev/fullchain2.pem -out /opt/CA/VirtualAppliance/custom/wildfly-ssl-certificates/caip-srv -password pass:changeit
restart_ip

Provisioning Server ETACALLBACK public certificate location (restart imps service) [Place in bin folder]

su - imps
cp -r -p /home/config/aks.iam.anapartner.dev/combine-chain-letsencrypt.pem /opt/CA/IdentityManager/ProvisioningServer/bin/
imps stop; imps start

Validation of updated services.

Use openssl s_client to validate certificates being used. Examples below for TCP 443 and 8443

true | openssl s_client -connect vapp143.aks.iam.anapartner.dev:443 -CAfile combine-chain-letsencrypt.pem  | grep "Verify return code"

true | openssl s_client -connect vapp143.aks.iam.anapartner.dev:8443 -CAfile combine-chain-letsencrypt.pem  | grep "Verify return code"

To view all certs in the chain, use the below openssl s_client command with -showcerts switch:

true | openssl s_client -connect vapp143.aks.iam.anapartner.dev:443 -CAfile combine-chain-letsencrypt.pem  -showcerts

true | openssl s_client -connect vapp143.aks.iam.anapartner.dev:8443 -CAfile combine-chain-letsencrypt.pem  -showcerts

Validate with browsers and view the HTTPS lock symbol to view the certificate

Test with an update to a Provisioning Global User’s attribute [Note: No need to sync to accounts]. Ensure that the Identity Manager Setup Log Level = DEBUG to monitor this submission with the Provisioning Server etanotifyXXXXXXX.log.

A view of the submission for updating the Global User’s Description via IMPS (IM Provisioning Server) etanotifyXXXXXXX.log. The configuration will be loaded for using the URLs defined. Then we can monitor for the submission of the update.

Finally, a view using the IME VST (View Submitted Tasks) for the ETACALLBACK process using the task Provisioning Modify User.

Common TLS errors seen with the Provisioning Server ETACALLBACK

Ensure that the configuration is enabled for debug log level, so we may view these errors to correct them. [rc=77] will occur if the PEM file does not exist or is not in the correct path. [rc=51] will occur if the URL defined does not match the exact server-side certificate (this is a good reason to use a wildcard certificate or adjust your URL FQDN to match the cert subject (CN=XXXX) value. [rc=60] will occur if the remote web service is using a self-signed certificate or if the certificate has any expiration dates within the certificate or chain or the public root CA cert.

Other Error messages (curl)

If you see an error message with Apache HTTPD (TCP 443) with curl about “curl: (60) Peer certificate cannot be authenticated with known CA certificates”, please ignore this, as the vApp does not have the “ca-bundle.crt” configuration enabled. See RedHat note: https://access.redhat.com/solutions/523823

References

https://knowledge.broadcom.com/external/article?articleId=54198
https://community.broadcom.com/HigherLogic/System/DownloadDocumentFile.ashx?DocumentFileKey=849ea21f-cc5a-4eac-9988-465a75165cf1
https://curl.se/libcurl/c/libcurl-env.html
https://knowledge.broadcom.com/external/article/204213/how-to-setup-inbound-notifications-to-us.html
https://knowledge.broadcom.com/external/article/213480/how-to-replace-the-vapp-wildfly-ssl-cert.html https://www.stephenwagner.com/2021/09/30/sophos-dst-root-ca-x3-expiration-problems-fix/

OpenShift on VMware Workstation

RedHat OpenShift is one of the container orchestration platforms that provides an enterprise-grade solution for deploying, running, and managing applications on public, on-premise, or hybrid cloud environments.

This blog entry outlines the high-level architecture of a LAB OpenShift on-prem cloud environment built on VMware Workstation infrastructure.

Red Hat OpenShift and the customized ISO image with Red Hat Core OS provide a straightforward process to build your lab and can help lower the training cost. You may watch the end-to-end process in the video below or follow this blog entry to understand the overall process.

Requirements:

  • Red Hat Developer Account w/ Red Hat Developer Subscription for Individuals
  • Local DNS to resolve a minimum of three (3) addresses for OpenShift. (api.[domain], api-int.[domain], *.apps.[domain])
  • DHCP Server (may use VMware Workstation NAT’s DHCP)
  • Storage (recommend using NFS for on-prem deployment/lab) for OpenShift logging/monitoring & any db/dir data to be retained.
  • SSH Terminal Program w/ SSH Key.
  • Browser(s)
  • Front Loader/Load Balancer (HAProxy)
  • VMware Workstation Pro 16.x
  • Specs: (We used more than the minimum recommended by OpenShift to prepare for other applications)
    • Three (3) Control Planes Nodes @ 8 vCPU/16 GB RAM/100 GB HDD with “Red Hat Enterprise Linux 8 x64 bit” Guest OS Type
    • Four (4) Worker Nodes @ 4 vCPU/16 GB RAM/100 GB HDD with “Red Hat Enterprise Linux 8 x64” Guest OS Type

Post-Efforts: Apply these to provide additional value. [Included as examples]

  • Add entropy service (haveged) to all nodes/pods to increase security & performance.
  • Let’sEncrypt wild card certs for *.[DOMAIN] and *.apps.[DOMAIN] to avoid self-signed certs for external UIs. Avoid using “thisisunsafe” within the Chrome browser to access the local OpenShift console.
  • Update OpenShift Ingress to be aware of more than two (2) worker nodes.
  • Update OpenShift to use NFS as default storage.

Below is a view of our footprint to deploy the OpenShift 4.x environment on a local data center hosted by VMware Workstation.

Red Hat OpenShift provides three (3) options to deploy. Cloud, Datacenter, Local. Local is similar to minikube for your laptop/workstation with a few pods. Red Hat OpenShift license for Cloud requires deployment on other vendors’ sites for the nodes (cpu/ram/disk) and load balancers. If you deploy OpenShift on AWS and GCP, plan a budget of $500/mo per resource for the assets.

After reviewing the open-source OKD solution and the various OpenShift deployment methods, we selected the “DataCenter” option within OpenShift. Two (2) points made this decision easy.

  • Red Hat OpenShift offers a sixty (60) day eval license.
    • This license can be restarted for another sixty (60) days if you delete/archive the last cluster.
  • Red Hat OpenShift provides a customized ISO image with Red Hat Core OS, ignition yaml files, and an embedded SSH Public Key, that does a lot of the heavy lifting for setting up the cluster.

The below screen showcases the process that Red Hat uses to build a bootstrap ISO image using Red Hat Core OS, Ignition yaml files (to determine node type of control plane/worker node), and the embedded SSH Key. This process provides a lot of value to building a cluster and streamlines the effort.

DNS Requirement

The minimal DNS entries required for OpenShift is three (3) addresses.

api.[domain]

api-int.[domain]

*.apps.[domain]

https://docs.openshift.com/container-platform/4.11/installing/installing_platform_agnostic/installing-platform-agnostic.html

Front Load Balancer (HAProxy)

Update HAproxy.cfg as needed for IP addresses / Ports. To avoid deployment of HAProxy twice, we use the “bind” command to join two (2) HAproxy configuration files together to prevent conflict on port 80/443 redirect for both OpenShift and another application deployed on OpenShift.

# Global settings
# Set $IP_RANGE as an OS ENV or Global variable before running HAPROXY
#   Important: If using VMworkstation NAT ensure this range is correctly defined to
#   avoid error message with x509 error on port 22623 upon startup on control planes
#
#   Ensure 3XXXX PORT is defined correct from the ingress
#    - We have predefined these ports to 32080 and 32443 for helm deployment of ingress
#    oc -n ingress get svc
#
#---------------------------------------------------------------------
global
    setenv IP_RANGE 192.168.243
    setenv HA_BIND_IP1 192.168.2.101
    setenv HA_BIND_IP2 192.168.2.111
    maxconn     20000
    log         /dev/log local0 info
    chroot      /var/lib/haproxy
    pidfile     /var/run/haproxy.pid
    user        haproxy
    group       haproxy
    daemon

    # turn on stats unix socket
    stats socket /var/lib/haproxy/stats

#---------------------------------------------------------------------
# common defaults that all the 'listen' and 'backend' sections will
# use if not designated in their block
#---------------------------------------------------------------------
defaults
    log                     global
    mode                    http
    option                  httplog
    option                  dontlognull
    option                  http-server-close
    option                  redispatch
    option forwardfor       except 127.0.0.0/8
    retries                 3
    maxconn                 20000
    timeout http-request    10000ms
    timeout http-keep-alive 10000ms
    timeout check           10000ms
    timeout connect         40000ms
    timeout client          300000ms
    timeout server          300000ms
    timeout queue           50000ms

# Enable HAProxy stats
# Important Note:  Patch OpenShift Ingress to allow internal RHEL CoreOS haproxy to run on additional worker nodes
#  oc patch -n openshift-ingress-operator ingresscontroller/default --patch '{"spec":{"replicas": 7}}' --type=merge
#
listen stats
    bind :9000
    stats uri /
    stats refresh 10000ms

# Kube API Server
frontend k8s_api_frontend
    bind :6443
    default_backend k8s_api_backend
    mode tcp
    option tcplog

backend k8s_api_backend
    mode tcp
    balance source
    server      ocp-cp-1_6443        "$IP_RANGE".128:6443 check
    server      ocp-cp-2_6443        "$IP_RANGE".129:6443 check
    server      ocp-cp-3_6443        "$IP_RANGE".130:6443 check

# OCP Machine Config Server
frontend ocp_machine_config_server_frontend
    mode tcp
    bind :22623
    default_backend ocp_machine_config_server_backend
    option tcplog

backend ocp_machine_config_server_backend
    mode tcp
    balance source
    server      ocp-cp-1_22623        "$IP_RANGE".128:22623 check
    server      ocp-cp-2_22623        "$IP_RANGE".129:22623 check
    server      ocp-cp-3_22623        "$IP_RANGE".130:22623 check

# OCP Machine Config Server #2
frontend ocp_machine_config_server_frontend2
    mode tcp
    bind :22624
    default_backend ocp_machine_config_server_backend2
    option tcplog

backend ocp_machine_config_server_backend2
    mode tcp
    balance source
    server      ocp-cp-1_22624        "$IP_RANGE".128:22624 check
    server      ocp-cp-2_22624        "$IP_RANGE".129:22624 check
    server      ocp-cp-3_22624        "$IP_RANGE".130:22624 check


# OCP Ingress - layer 4 tcp mode for each. Ingress Controller will handle layer 7.
frontend ocp_http_ingress_frontend
    bind "$HA_BIND_IP1":80
    default_backend ocp_http_ingress_backend
    mode tcp
    option tcplog

backend ocp_http_ingress_backend
    balance source
    mode tcp
    server      ocp-w-1_80     "$IP_RANGE".131:80 check
    server      ocp-w-2_80     "$IP_RANGE".132:80 check
    server      ocp-w-3_80     "$IP_RANGE".133:80 check
    server      ocp-w-4_80     "$IP_RANGE".134:80 check
    server      ocp-w-5_80     "$IP_RANGE".135:80 check
    server      ocp-w-6_80     "$IP_RANGE".136:80 check
    server      ocp-w-7_80     "$IP_RANGE".137:80 check

frontend ocp_https_ingress_frontend
    bind "$HA_BIND_IP1":443
    default_backend ocp_https_ingress_backend
    mode tcp
    option tcplog

backend ocp_https_ingress_backend
    mode tcp
    balance source
    server      ocp-w-1_443     "$IP_RANGE".131:443 check
    server      ocp-w-2_443     "$IP_RANGE".132:443 check
    server      ocp-w-3_443     "$IP_RANGE".133:443 check
    server      ocp-w-4_443     "$IP_RANGE".134:443 check
    server      ocp-w-5_443     "$IP_RANGE".135:443 check
    server      ocp-w-6_443     "$IP_RANGE".136:443 check
    server      ocp-w-7_443     "$IP_RANGE".137:443 check

######################################################################################

# VIPAUTHHUB Ingress
frontend vip_http_ingress_frontend
    bind "$HA_BIND_IP2":80
    mode tcp
    option forwardfor
    option http-server-close
    default_backend vip_http_ingress_backend

backend vip_http_ingress_backend
    mode tcp
    balance roundrobin
    server      vip-w-1_32080     "$IP_RANGE".131:32080 check fall 3 rise 2 send-proxy-v2
    server      vip-w-2_32080     "$IP_RANGE".132:32080 check fall 3 rise 2 send-proxy-v2
    server      vip-w-3_32080     "$IP_RANGE".133:32080 check fall 3 rise 2 send-proxy-v2
    server      vip-w-4_32080     "$IP_RANGE".134:32080 check fall 3 rise 2 send-proxy-v2
    server      vip-w-5_32080     "$IP_RANGE".135:32080 check fall 3 rise 2 send-proxy-v2
    server      vip-w-6_32080     "$IP_RANGE".136:32080 check fall 3 rise 2 send-proxy-v2
    server      vip-w-7_32080     "$IP_RANGE".137:32080 check fall 3 rise 2 send-proxy-v2

frontend vip_https_ingress_frontend
    bind "$HA_BIND_IP2":443
    # mgmt-sspfqdn
    acl is_mgmt_ssp hdr_end(host) -i mgmt-ssp.okd.anapartner.dev
    use_backend vip_ingress-nodes_mgmt-nodeport if is_mgmt_ssp
    mode tcp
    #option forwardfor
    option http-server-close
    default_backend vip_https_ingress_backend

backend vip_https_ingress_backend
    mode tcp
    balance roundrobin
    server      vip-w-1_32443     "$IP_RANGE".131:32443 check fall 3 rise 2 send-proxy-v2
    server      vip-w-2_32443     "$IP_RANGE".132:32443 check fall 3 rise 2 send-proxy-v2
    server      vip-w-3_32443     "$IP_RANGE".133:32443 check fall 3 rise 2 send-proxy-v2
    server      vip-w-4_32443     "$IP_RANGE".134:32443 check fall 3 rise 2 send-proxy-v2
    server      vip-w-5_32443     "$IP_RANGE".135:32443 check fall 3 rise 2 send-proxy-v2
    server      vip-w-6_32443     "$IP_RANGE".136:32443 check fall 3 rise 2 send-proxy-v2
    server      vip-w-7_32443     "$IP_RANGE".137:32443 check fall 3 rise 2 send-proxy-v2

backend vip_ingress-nodes_mgmt-nodeport
    mode tcp
    balance roundrobin
    server      vip-w-1_32443     "$IP_RANGE".131:32443 check fall 3 rise 2 send-proxy-v2
    server      vip-w-2_32443     "$IP_RANGE".132:32443 check fall 3 rise 2 send-proxy-v2
    server      vip-w-3_32443     "$IP_RANGE".133:32443 check fall 3 rise 2 send-proxy-v2
    server      vip-w-4_32443     "$IP_RANGE".134:32443 check fall 3 rise 2 send-proxy-v2
    server      vip-w-5_32443     "$IP_RANGE".135:32443 check fall 3 rise 2 send-proxy-v2
    server      vip-w-6_32443     "$IP_RANGE".136:32443 check fall 3 rise 2 send-proxy-v2
    server      vip-w-7_32443     "$IP_RANGE".137:32443 check fall 3 rise 2 send-proxy-v2

######################################################################################

Use the following commands to add 2nd IP address to one NIC on the main VMware Workstation Host, where NIC = eno1 and 2nd IP address = 192.168.2.111

nmcli dev show eno1
sudo nmcli dev mod eno1 +ipv4.address 192.168.2.111/24

VMware Workstation Hosts / Nodes

When building the VMware hosts, ensure that you use Guest Type “Red Hat Enterprise Linux 8 x64” to match the embedded Red Hat Core OS provided in an ISO image. Otherwise, DHCP services may not work correctly, and when the VMware host boots, it may not receive an IP address.

The VMware hosts for Control Planes Nodes are recommended to be 8 vCPU, 16 GB RAM, and 100 HDD. The VMware hosts for Worker Nodes are recommended to be 4 vCPU, 16 GB RAM, and 100 HDD.
OpenShift requires a minimum of three (3) Control Plane Nodes and two (2) Worker Nodes. Please check with any solution you may deploy and adjust the parameters as needed. We will deploy four (4) Worker Nodes for Symantec VIP Auth Hub solution. And horizontally scale the solution with more worker nodes for Symantec API Manager and Siteminder.

Before starting any of these images, create a local snapshot as a “before” state. This will allow you to redeploy with minimal impact if there is any issue.

Before starting the deployment, you may wish to create a new NAT VMware Network, to avoid impacting any existing VMware images on the same address range. We will be adjusting the dhcpd.conf and dhcpd.leases files for this network.

To avoid an issue with reverse DNS lookup within PODS and Containers, remove a default value from dhcpd.conf. Stop vmware network, remove or comment out the line “option domain-name localdomain;” , remove any dhcpd.leases information, then restart the vmware network.

ls -lart /etc/vmware/vmnet8/dhcpd/dhcpd.leases ; echo ""
sudo /usr/bin/vmware-networks --stop ; echo ""
sudo cp /dev/null /etc/vmware/vmnet8/dhcpd/dhcpd.leases ; echo ""
ls -lart /etc/vmware/vmnet8/dhcpd/dhcpd.leases ; echo ""
cat      /etc/vmware/vmnet8/dhcpd/dhcpd.leases ; echo ""
sudo /usr/bin/vmware-networks --start ; echo ""
ls -lart /etc/vmware/vmnet8/dhcpd/dhcpd.leases ; echo ""
cat      /etc/vmware/vmnet8/dhcpd/dhcpd.leases ; echo ""

OpenShift / Kubernetes / Helm Command Line Binaries

Download these two (2) client packages to have three (3) binaries for interfacing with OpenShift/Kubernetes API Server.

Download Openshift Binaries for remote management (on main host)
#########################
sudo su -
cd /tmp/openshift
curl -skOL https://mirror.openshift.com/pub/openshift-v4/clients/helm/latest/helm-linux-amd64.tar.gz ; tar -zxvf helm-linux-amd64.tar.gz
curl -skOL https://mirror.openshift.com/pub/openshift-v4/x86_64/clients/ocp/stable/openshift-client-linux.tar.gz ; tar -zxvf openshift-client-linux.tar.gz
mv -f oc /usr/bin/oc
mv -f kubectl /usr/bin/kubectl
mv -f helm-linux-amd64 /usr/local/bin/helm
oc version
helm version
kubectl version

Start an OpenShift Cluster Deployment

OpenID Configuration with OpenShift

Post-deployment step: After you have deployed OpenShift cluster, you will be asked to create an IDP to authenticate other accounts. Below is an example with OpenShift and MS Azure. The image below showcases the parameters and values to be shared between the two solutions.

Entropy DaemonSet for OpenShift Nodes/Pods

We can validate the entropy on an OpenShift nodes or Pod via use of /dev/random. We prefer to emulate a 1000 password changes that showcase how rapidly the entropy pool of 4K is depleted when a security process accesses it. Example of the single line bash code.

Validate Entropy in Openshift Nodes [Before/After use of Haveged Deployment]
#########################
(counter=1;MAX=1001;time while [ $counter -le $MAX ]; do echo "";echo "##########  $counter ##########" ; echo "Entropy = `cat /proc/sys/kernel/random/entropy_avail`  out of 4096"; echo "" ; time dd if=/dev/random bs=8 count=1 2>/dev/null | base64; counter=$(( $counter + 1 )); done;)

To deploy an entropy daemonset, we can leverage what is documented by Broadcom/Symantec in their VIP Auth Hub documentation. https://techdocs.broadcom.com/us/en/symantec-security-software/identity-security/vip-authentication-hub/2022-Oct/operating/troubleshooting/checking-entropy-level.html#concept.dita_d3303fde-e786-4fd4-b0b6-e3a28fd60a82

$ cat <<EOF > | kubectl apply -f -
apiVersion: apps/v1
kind: DaemonSet
metadata:
  namespace: kube-system
  labels:
    run: haveged
  name: haveged
spec:
  selector:
    matchLabels:
      run: haveged
  template:
    metadata:
      labels:
        run: haveged
    spec:
      containers:
      - image: hortonworks/haveged:1.1.0
        name: haveged
        securityContext:
          privileged: true
      tolerations:
      - effect: NoSchedule
        operator: Exists
EOF

Patch OpenShift Workers

If the number of OpenShift Workers is greater than two (2), then you will need to patch the OpenShift Ingress controller to scale up to the number of worker nodes.

WORKERS=`oc get nodes | grep worker | wc -l`

echo ""
echo "######################################################################"
echo "# of Worker replicas in OpenShift Ingress Prior to update"
echo "oc get -n openshift-ingress-operator ingresscontroller -o yaml | grep -i replicas:"
#echo "######################################################################"
echo ""
oc patch -n openshift-ingress-operator ingresscontroller/default --patch "{\"spec\":{\"replicas\": ${WORKERS}}}" --type=merge

LetsEncrypt Certs for OpenShift Ingress and API Server

The certs with OpenShift are self-signed. This is not an issue until you attempt to access the local OpenShift console with a browser and are stopped from accessing the UI by newer security enforcement in the browsers. To avoid this challenge, we recommend switching the certs to LetsEncrypt. There are many examples how to rotate the certs. We used the below link to rotate the certs. https://docs.openshift.com/container-platform/4.12/security/certificates/replacing-default-ingress-certificate.html

echo "Installing ConfigMap for the Default Ingress Controllers"
oc delete configmap letsencrypt-fullchain-ca -n  openshift-config &>/dev/null
oc create configmap letsencrypt-fullchain-ca \
     --from-file=ca-bundle.crt=${CHAINFILE} \
     -n openshift-config

oc patch proxy/cluster \
     --type=merge \
     --patch='{"spec":{"trustedCA":{"name":"letsencrypt-fullchain-ca"}}}'

echo "Installing Certificates for the Default Ingress Controllers"
oc delete secret letsencrypt-certs -n openshift-ingress &>/dev/null
oc create secret tls letsencrypt-certs \
  --cert=${CHAINFILE} \
  --key=${KEYFILE} \
  -n openshift-ingress


echo "Backup prior version of ingresscontroller"
oc get ingresscontroller default -n openshift-ingress-operator -o yaml > /tmp/ingresscontroller.$DATE.yaml
oc patch ingresscontroller.operator default -n openshift-ingress-operator --type=merge --patch='{"spec": { "defaultCertificate": { "name": "letsencrypt-certs" }}}'


echo "Installing Certificates for the API Endpoint"
oc delete secret letsencrypt-certs  -n openshift-config  &>/dev/null
oc create secret tls letsencrypt-certs \
  --cert=${CHAINFILE} \
  --key=${KEYFILE} \
  -n openshift-config

echo "Backup prior version of apiserver"
oc get apiserver cluster -o yaml > /tmp/apiserver_cluster.$DATE.yaml
oc patch apiserver cluster --type merge --patch="{\"spec\": {\"servingCerts\": {\"namedCertificates\": [ { \"names\": [  \"$LE_API\"  ], \"servingCertificate\": {\"name\": \"letsencrypt-certs\" }}]}}}"

echo "#####################################################################################"
echo "true | openssl s_client -connect api.${DOMAIN}:443 --showcerts --servername api.${DOMAIN}"
echo ""


echo "It may take 5-10 minutes for the OpenShift Ingress/API Pods to cycle with the new certs"
echo "You may monitor with:  watch -n 2 'oc get pod -A | grep -i -v -e running -e complete'  "
echo ""
echo "Per Openshift documentation use the below command to monitor the state of the API server"
echo "ensure PROGRESSING column states False as the status before continuing with deployment"
echo ""
echo "oc get clusteroperators kube-apiserver "

Please reach out if you wish to learn more or have ANA assist with Kubernetes / OpenShift opportunities.